With the EB Advanced Navigation block, you can easily add a menu to your WordPress website. It can help you provide smooth navigation to your pages & posts in an organized & stunning manner.
Follow this step-by-step guide to add Essential Blocks Advanced Navigation using at ease.
Note: Install and activate the Essential Blocks for Gutenberg plugin into your WordPress dashboard before starting this tutorial.
How To Activate Essential Blocks Advanced Navigation? #
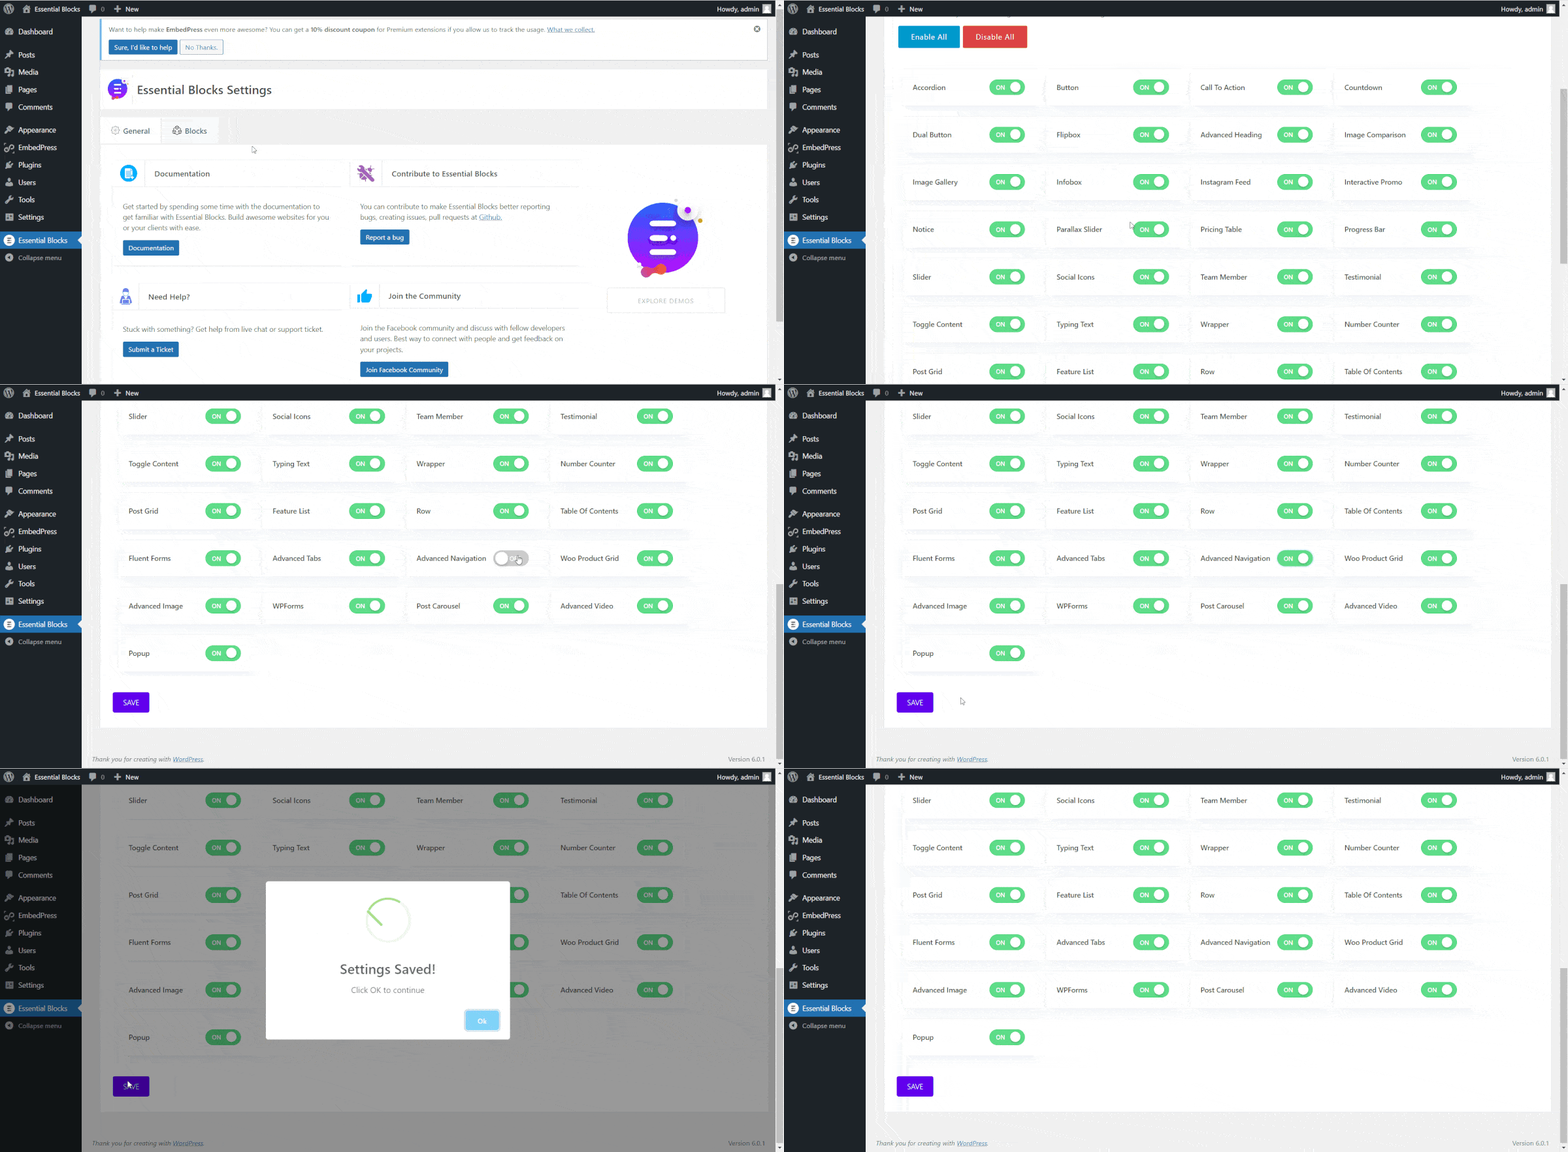
To activate EB Advanced Navigation, go to ‘Essential Blocks’ → ‘Blocks’ from the WordPress dashboard, as shown below. Then, toggle to enable this ‘Advanced Navigation’ block. After that, click on the ‘Save’ button to get started.
How To Configure Essential Blocks Advanced Navigation? #
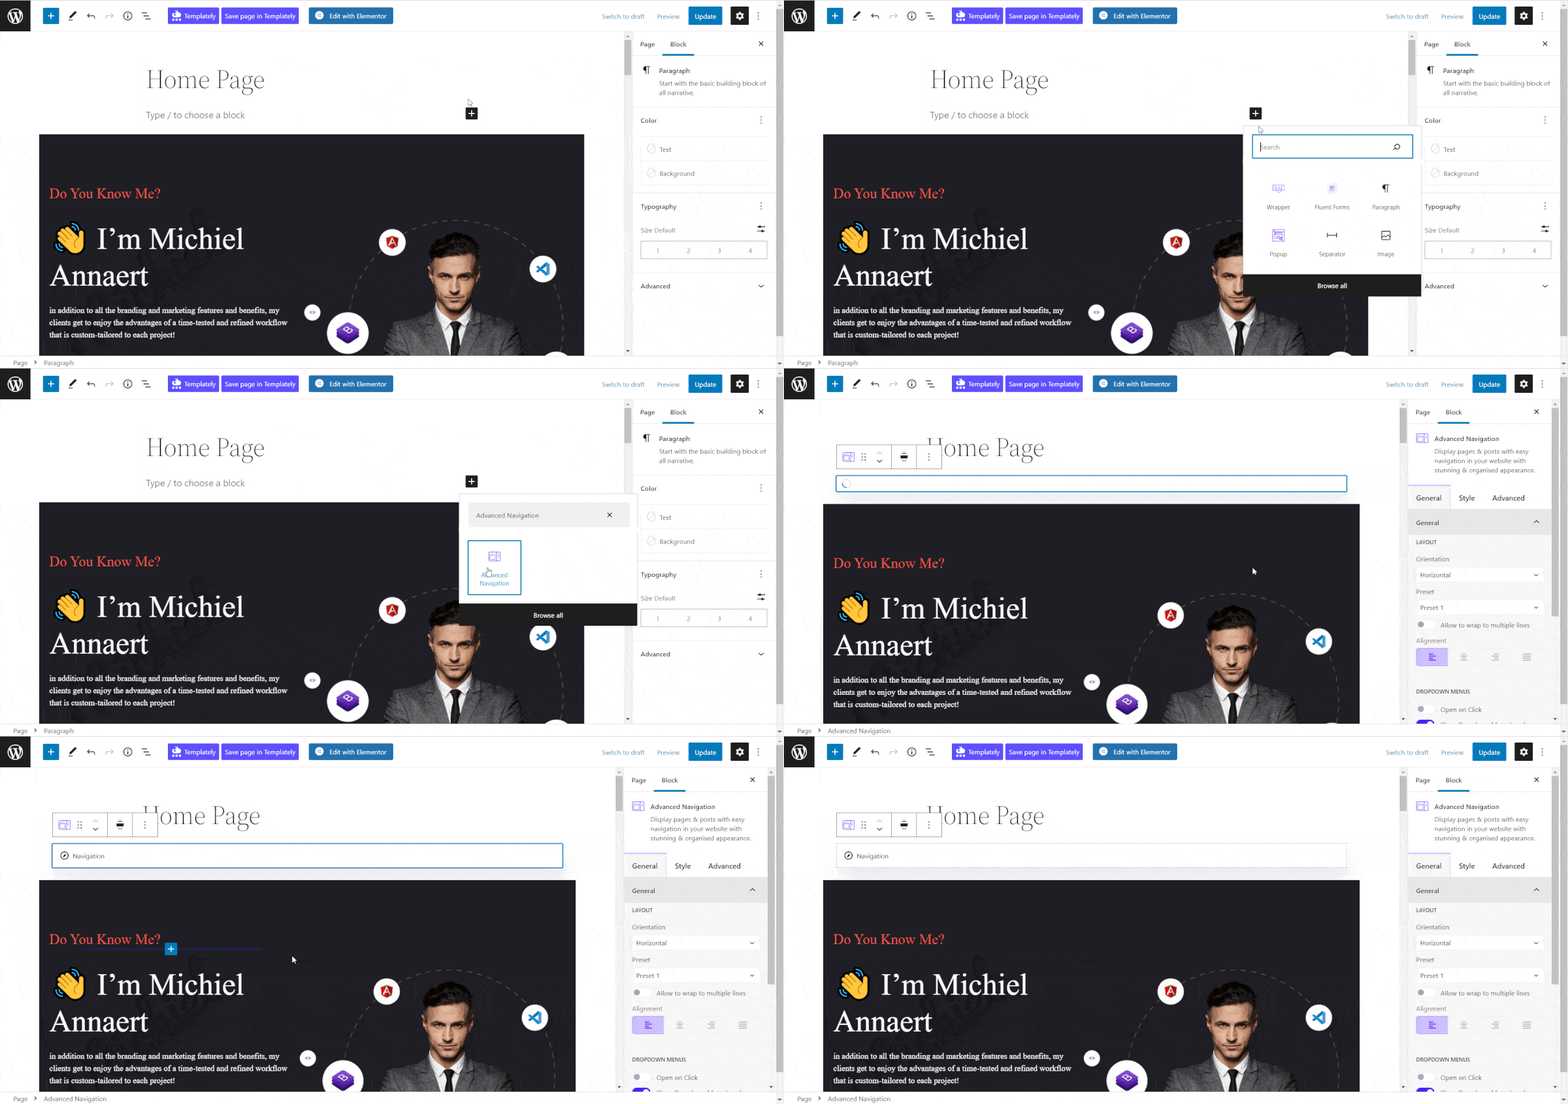
Now, open the page where you want to insert a navigation menu in Gutenberg. Then click on the ‘+’ button and search for the ‘Advanced Navigation’ block. Simply click on the block when it appears, and it will be added instantly to your web page.
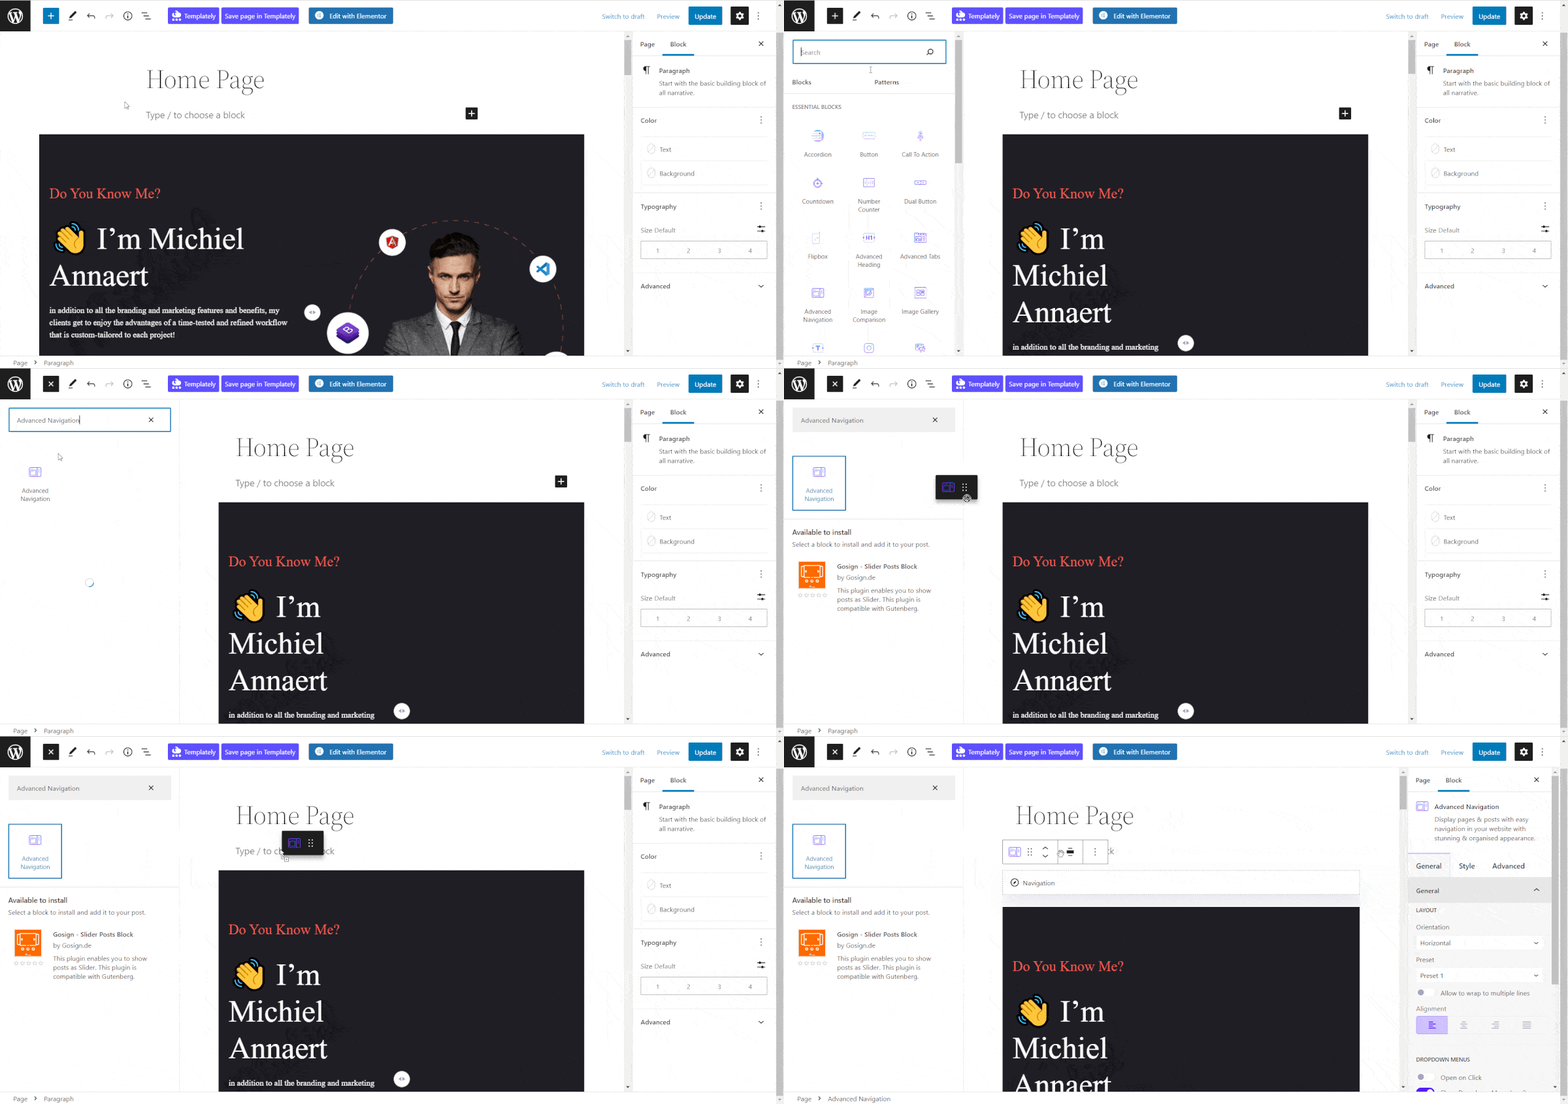
Alternatively, you can also add this block to your web page by clicking on the ‘+’ icon from the top left corner and then search for ‘Advanced Navigation’. When it appears, simply drag and drop the block to your web page.
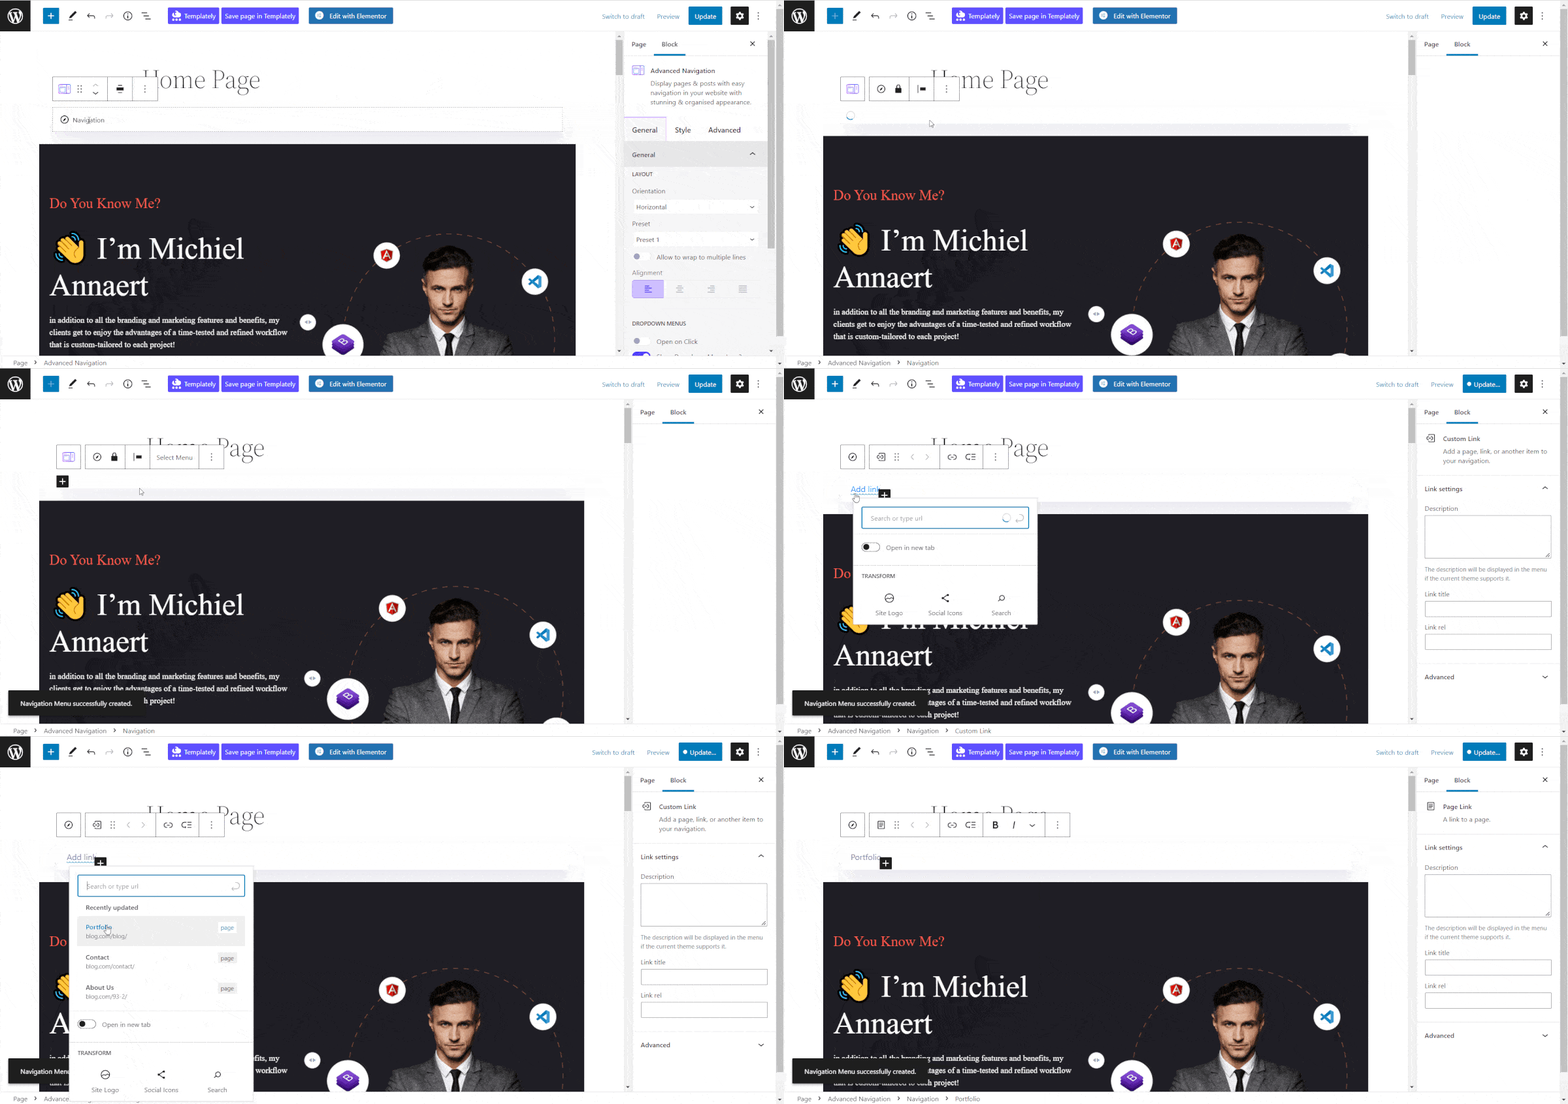
Once you have added the EB Advanced Navigation block to your website, you need to link the pages that you want to showcase on the navigation menu. So, hit the navigation bar block and click on the ‘Start empty’ option that appears, and then click again on the ‘+’ icon.
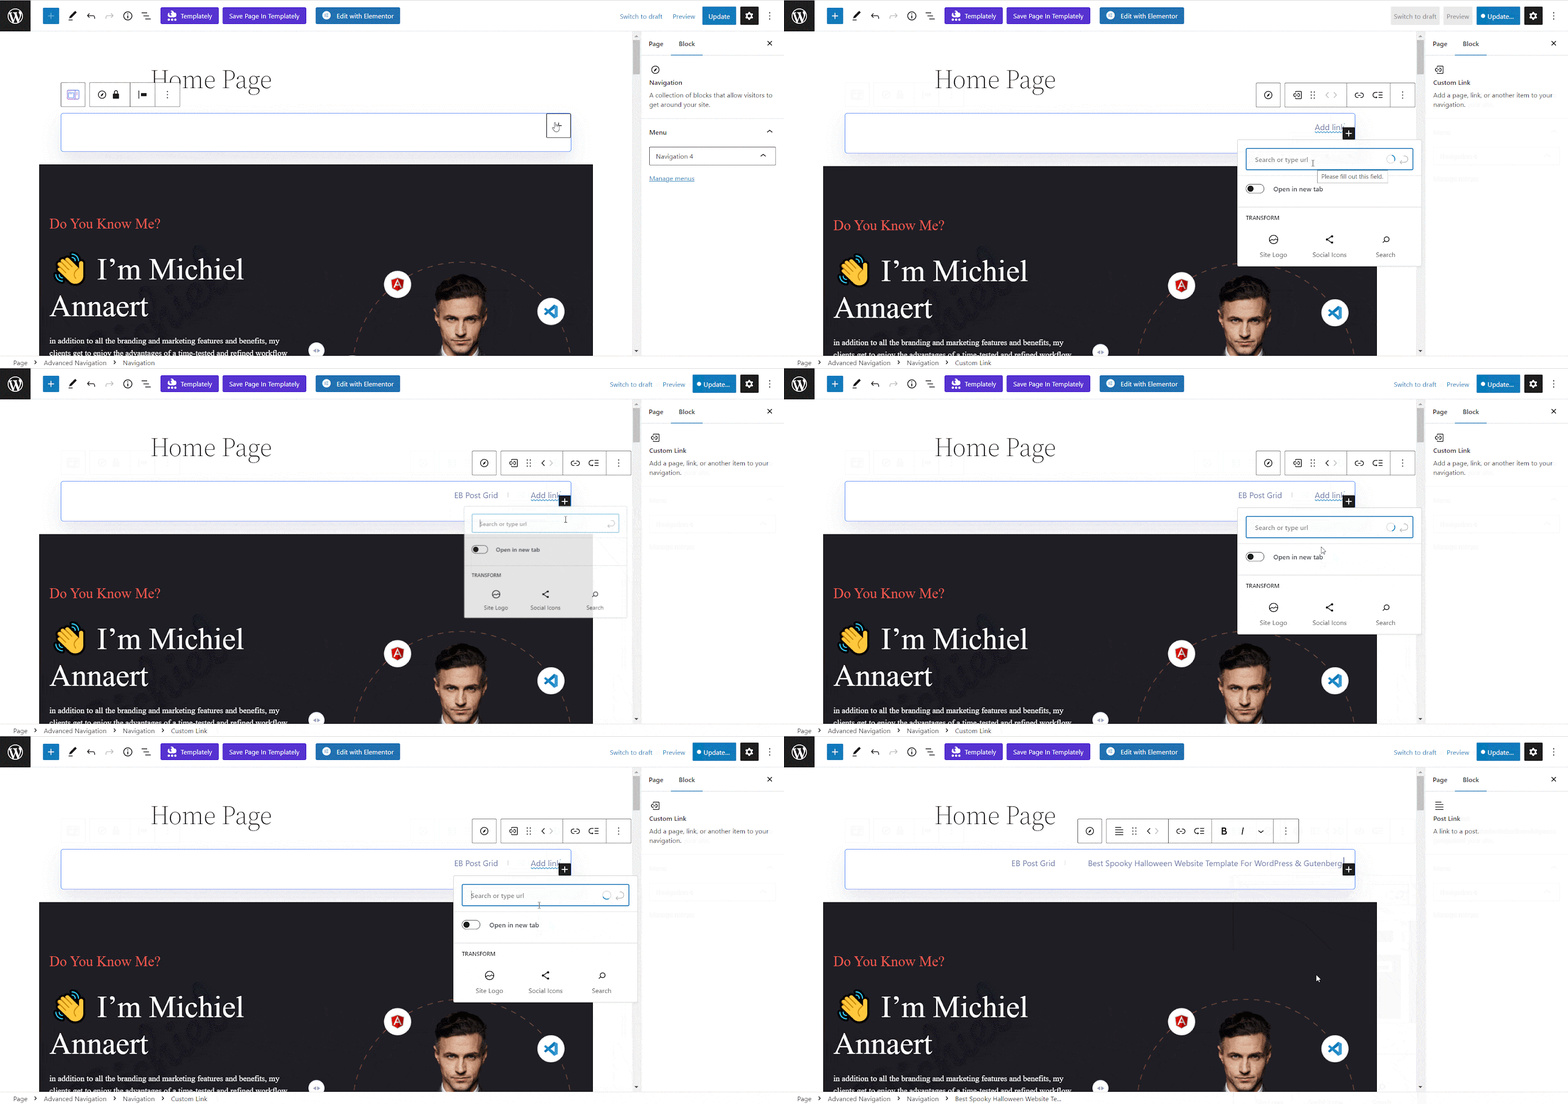
Now, choose and enter the page or post link that you want to add to your navigation menu. By clicking on the ‘+’ icon that appears again, you can add as many pages or posts as you want to add to your navigation bar.
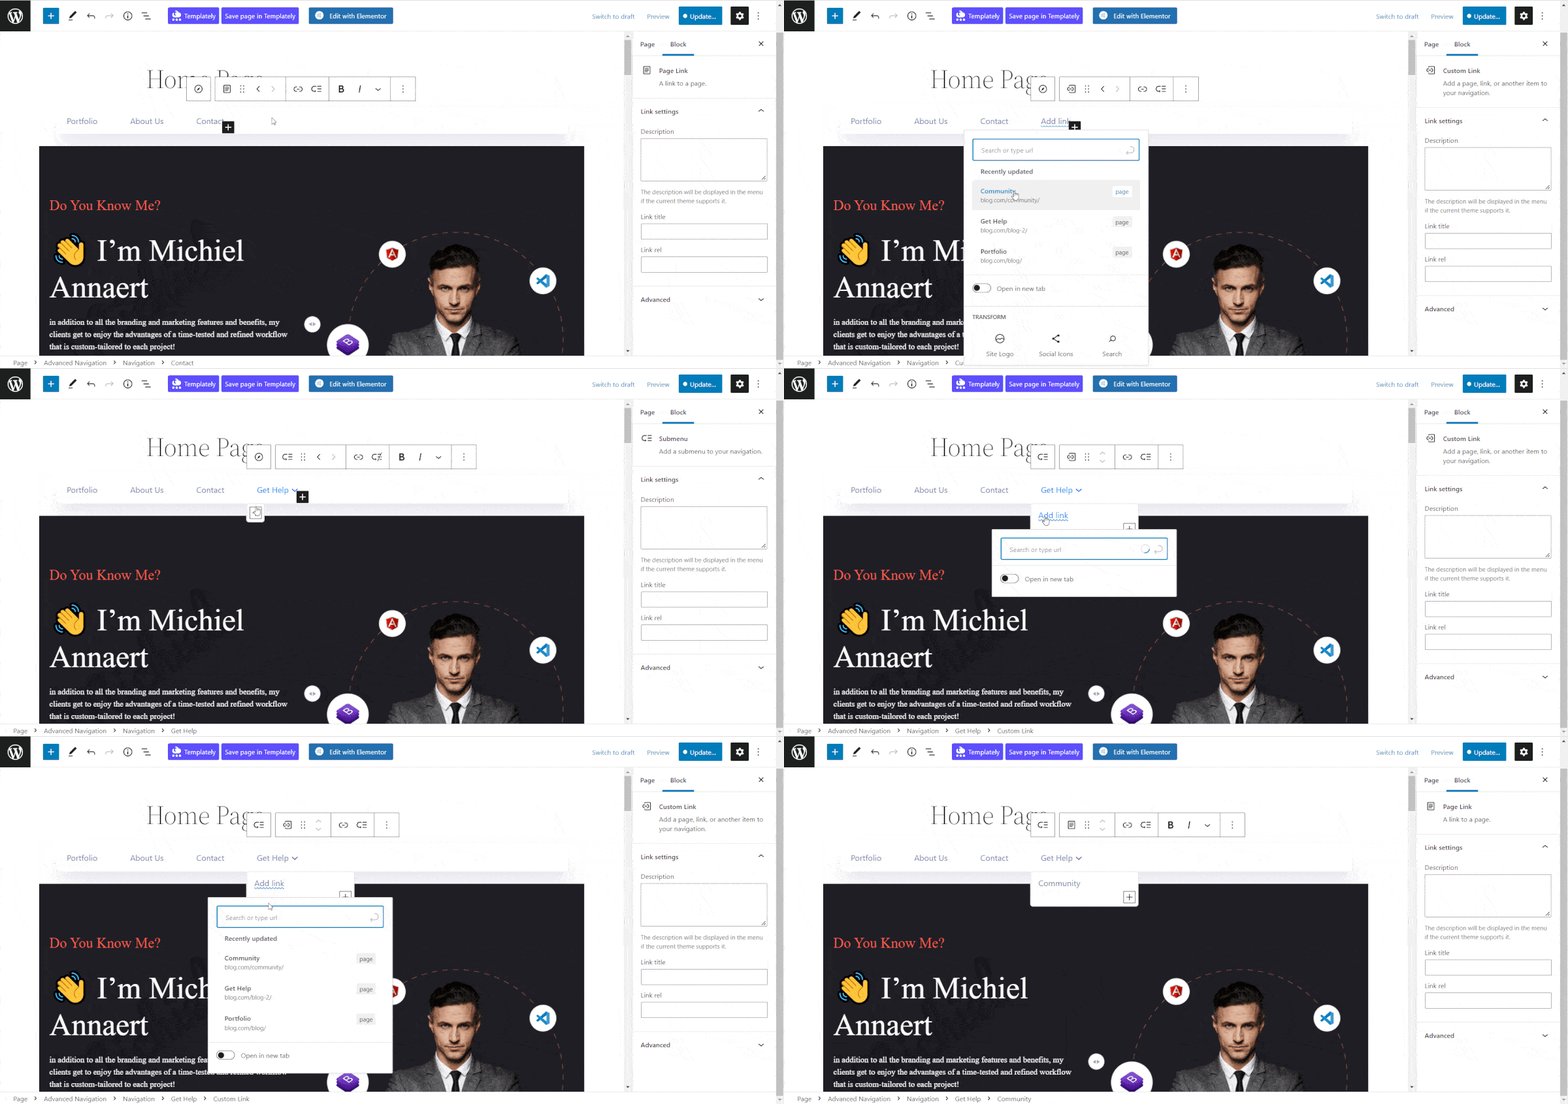
Similarly, you can also add a submenu for each of the menu items and make your navigation block even more helpful for your visitors. To do so, select the navigation item where you want to include submenus, click on the ‘Submenu add‘ icon which appears on the block option bar, and add pages or posts under it.
After you hit the ‘Add submenu’ icon and click on the ‘+’ icon below the menu that you have inserted for adding the submenu link. Here, you can add the link to your chosen page or post that you want to add as a submenu. Similarly, you can submenus to each navigation item easily.
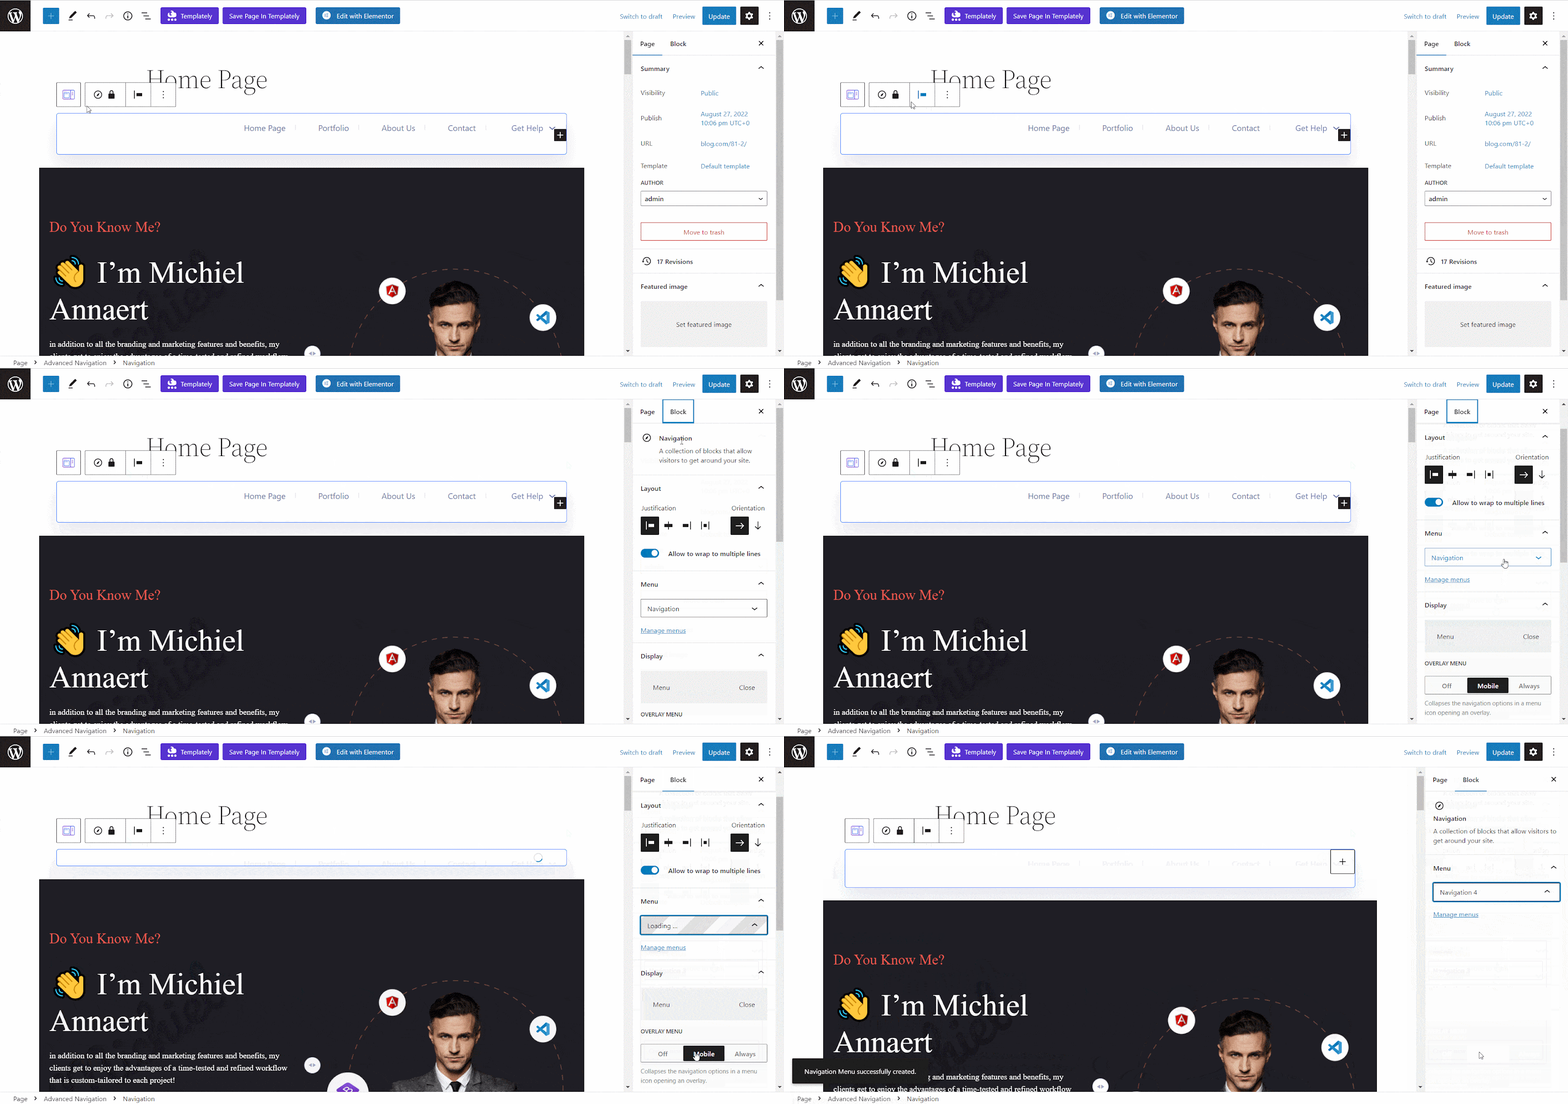
Now, if you want to choose a separate navigation menu click on the Navigation Icon and go to the side panel. From the ‘Menu’ option hit on ‘Navigation’ to open the drop-down menu. Click on the ‘Create new menu’ to add a new navigation menu on your WordPress site and select it as your active menu.
Click on the ‘+’ icon and choose and enter the page or post link that you want to add to your navigation menu as shown earlier.
General #
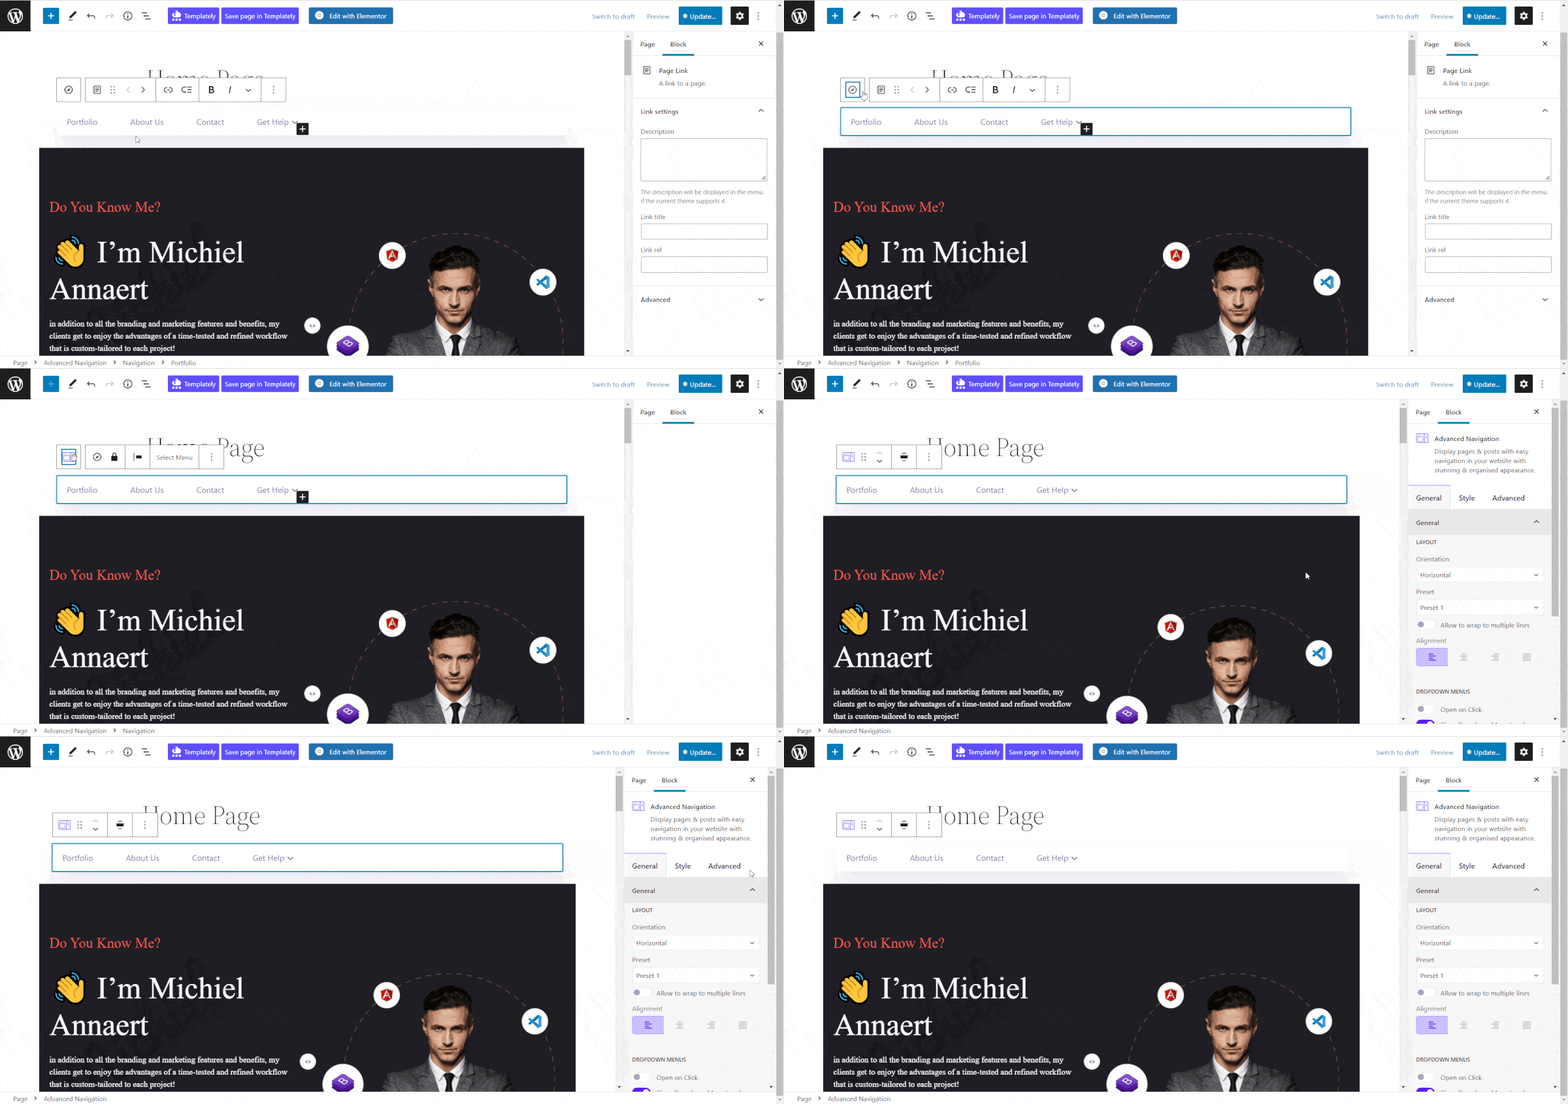
To customize the block to your needs, click on the navigation icon from the block option bar and select ‘Advanced Navigation’ to open the Gutenberg Settings panel on the sidebar. Then, go to the ‘General’ tab to customize.
LAYOUT #
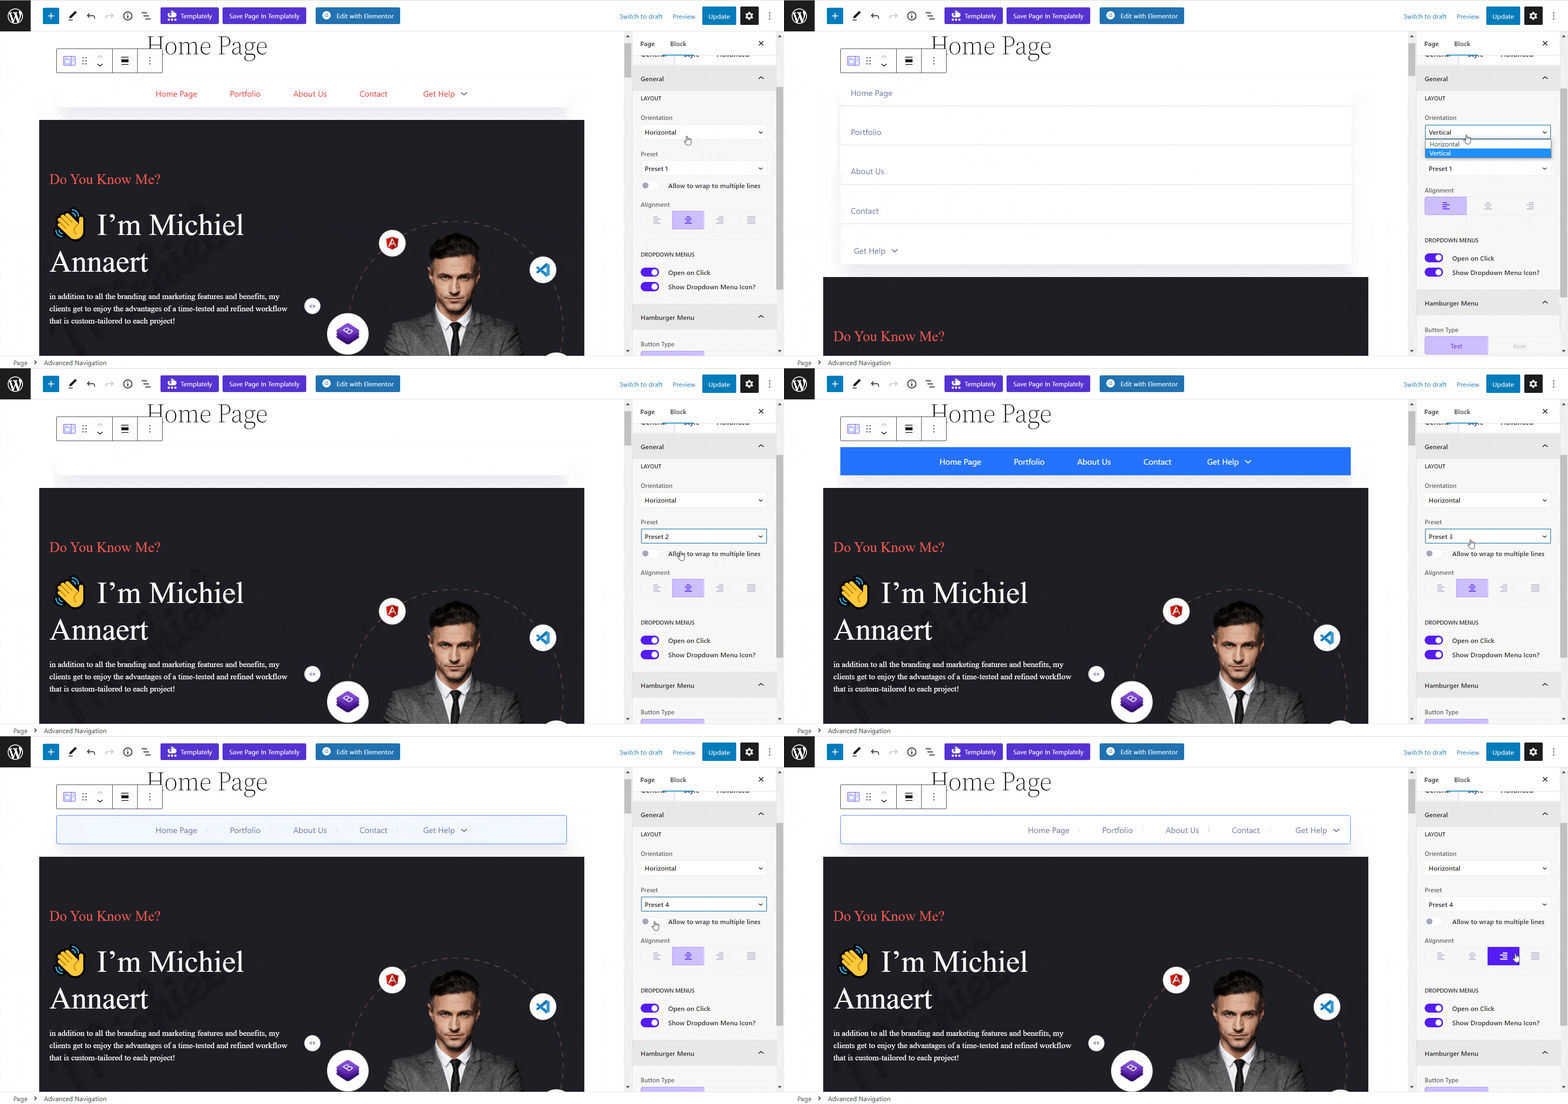
From the ‘Layout’ section, you can customize the menu ‘Orientation’, and you can display the navigation bar in a Vertical or Horizontal orientation. Then, you can also choose a preset from the ‘Preset’ option from available ready design styles and align the menu items as needed.
DROPDOWN MENUS #
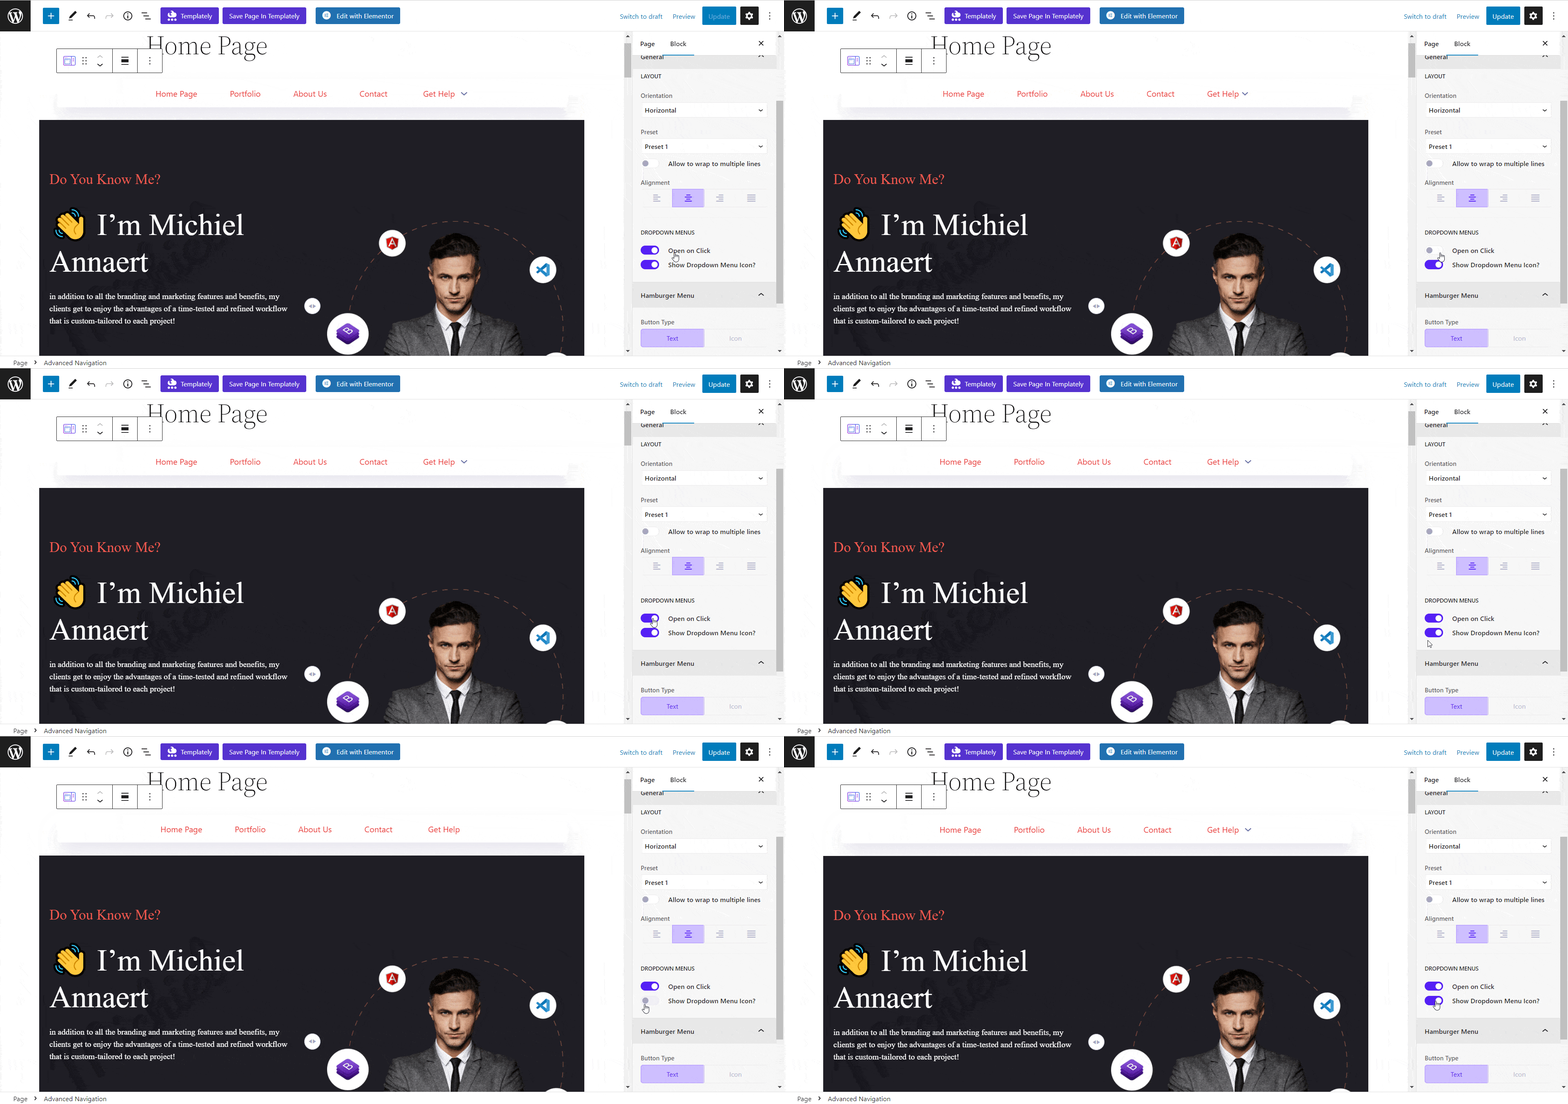
You can customize the drop-down menu from this option. Toggle on the ‘Open on Click’ button if you want to open the drop-down submenu after clicking on the menu item. Also, if you don’t want to showcase the dropdown icon, toggle it off from there.
Hamburger Menu #
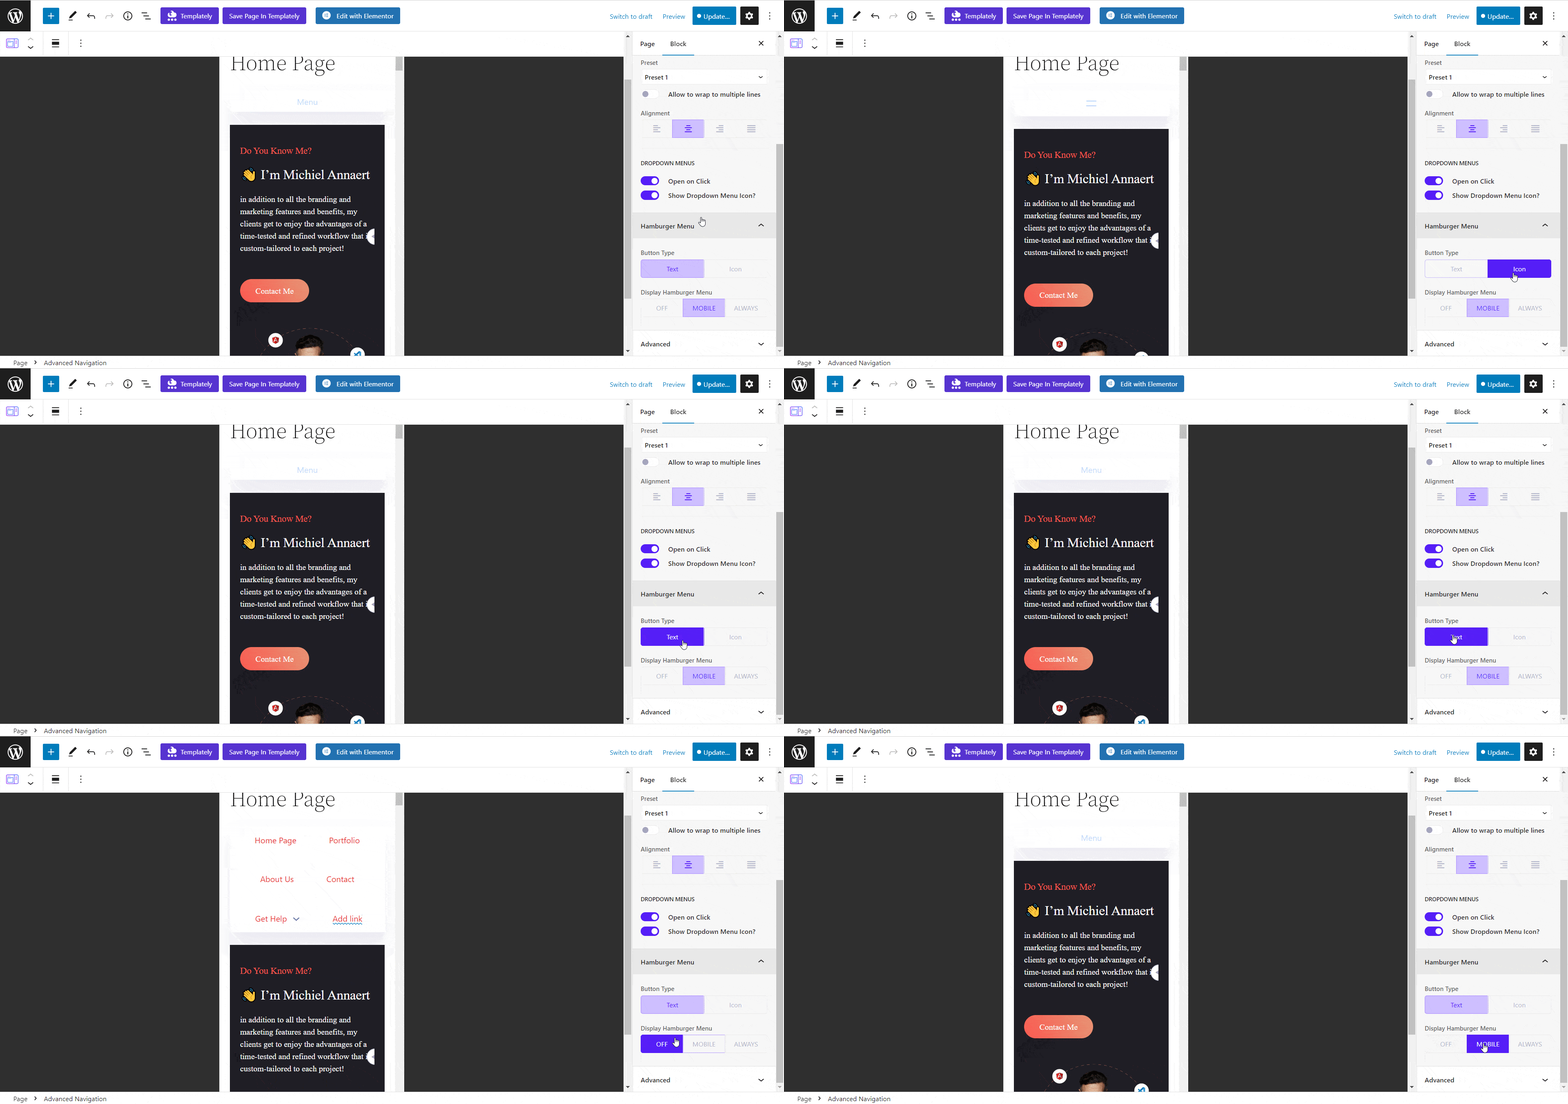
From the Hamburger Menu option, you can optimize your navigation menu, and make it compatible with the screen sizes of different devices. You can also select the ‘Button Type’ and choose the ‘Display Hamburger Menu’ option from there.
Styles #
From the ‘Styles’ tab, you can personalize the appearance of the Advanced Navigation block. You will get plenty of options to customize the navigation menu.
Navigation #
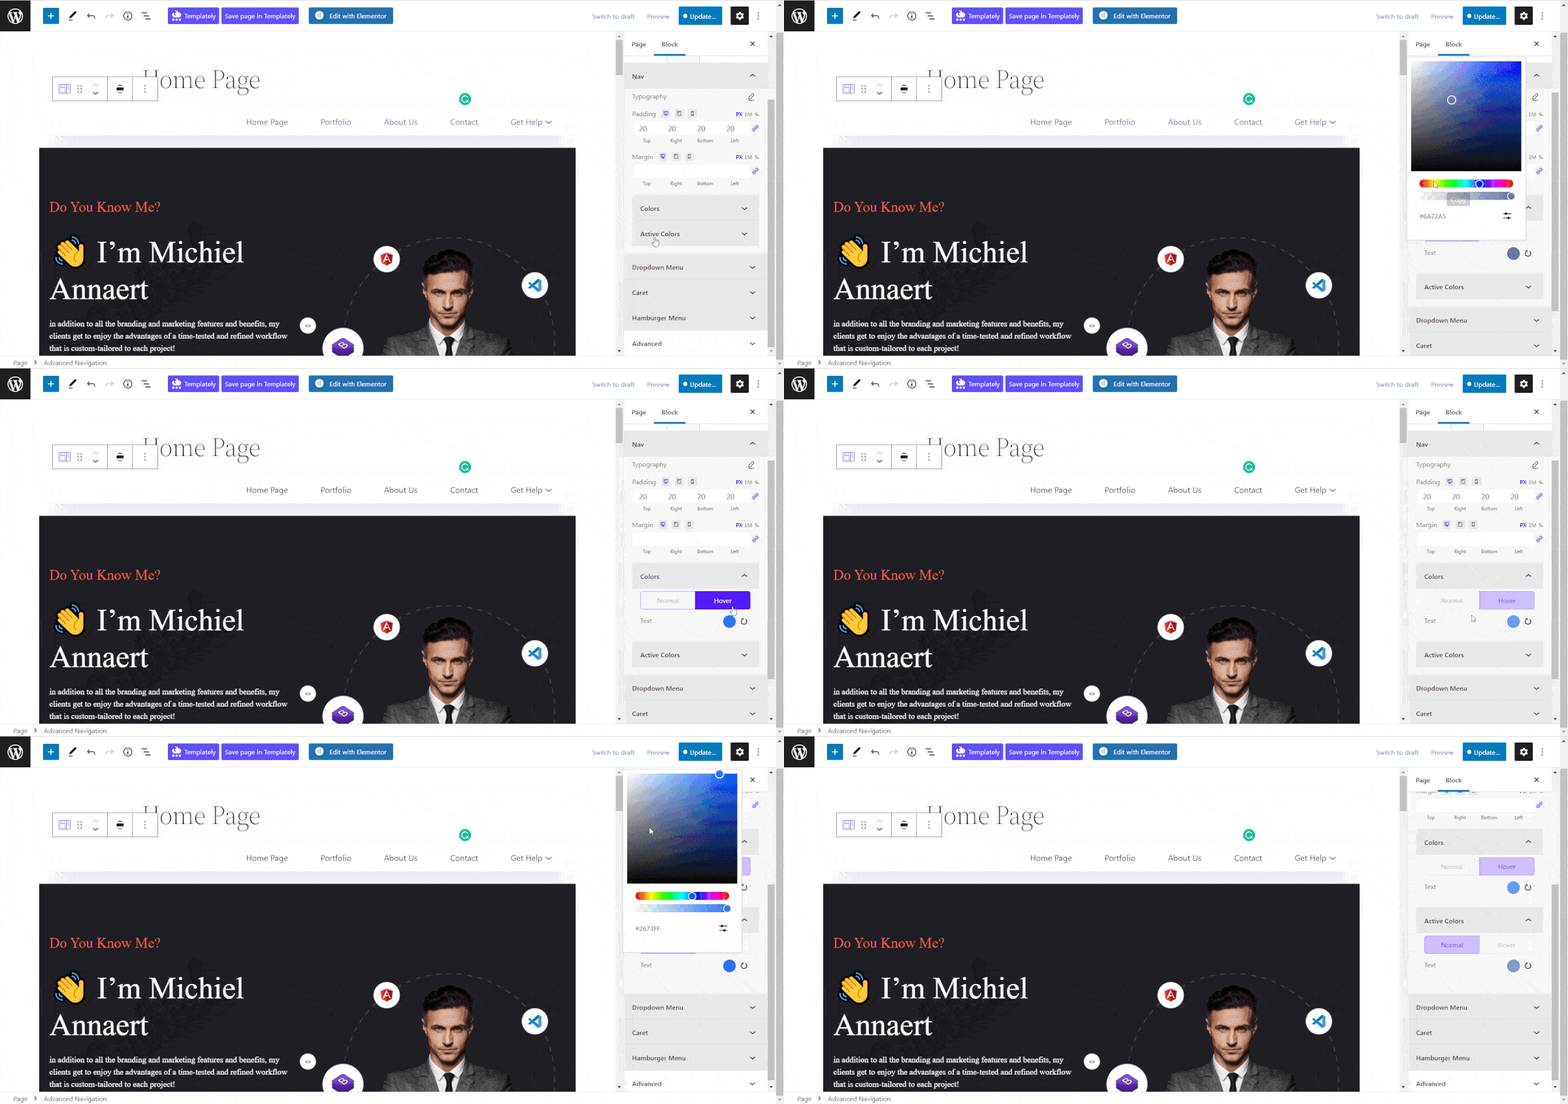
From the ‘Navigation’ option, you will find the options for choosing ‘Typography’ for the navigation menu. Add the ‘Padding’ & “Margin’ from there to the navigation bar.
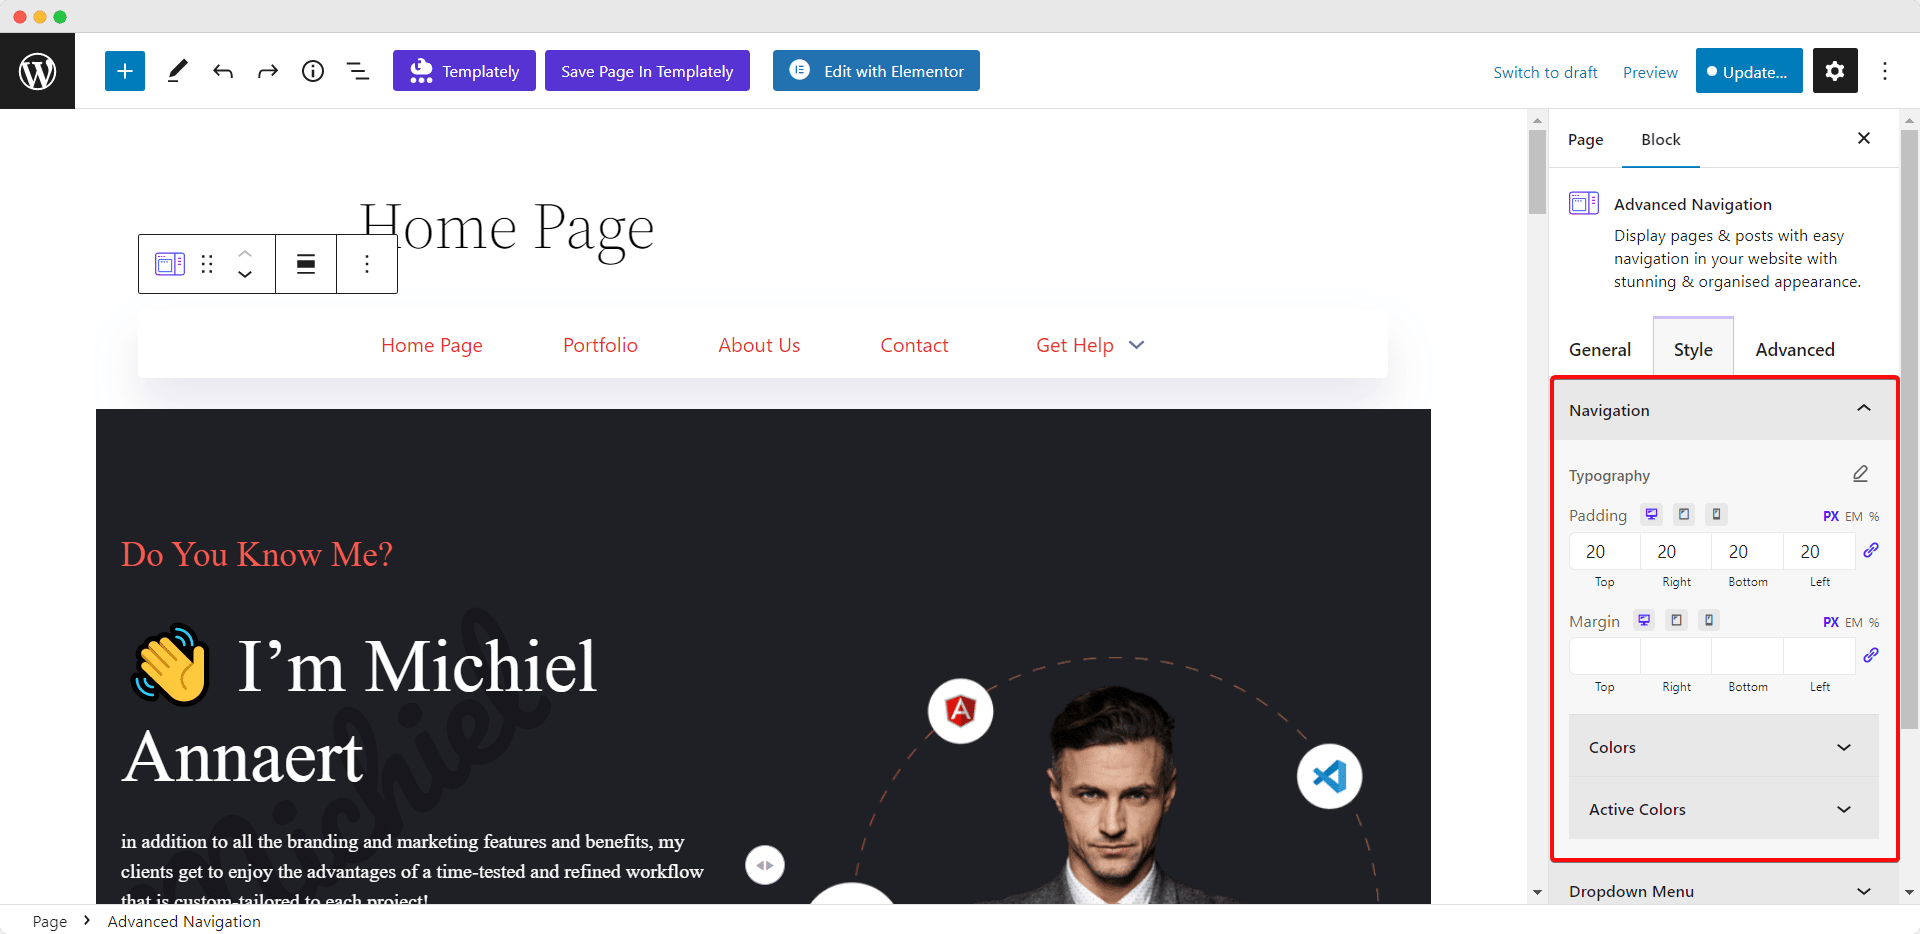
On the ‘Navigation’ option, you can customize the color of your navigation menu from the ‘Color’ option. Adjust the color of the menu and add a hover effect from there. Also, select the color for the active page menu from the ‘Active Color’ option.
Dropdown Menu #
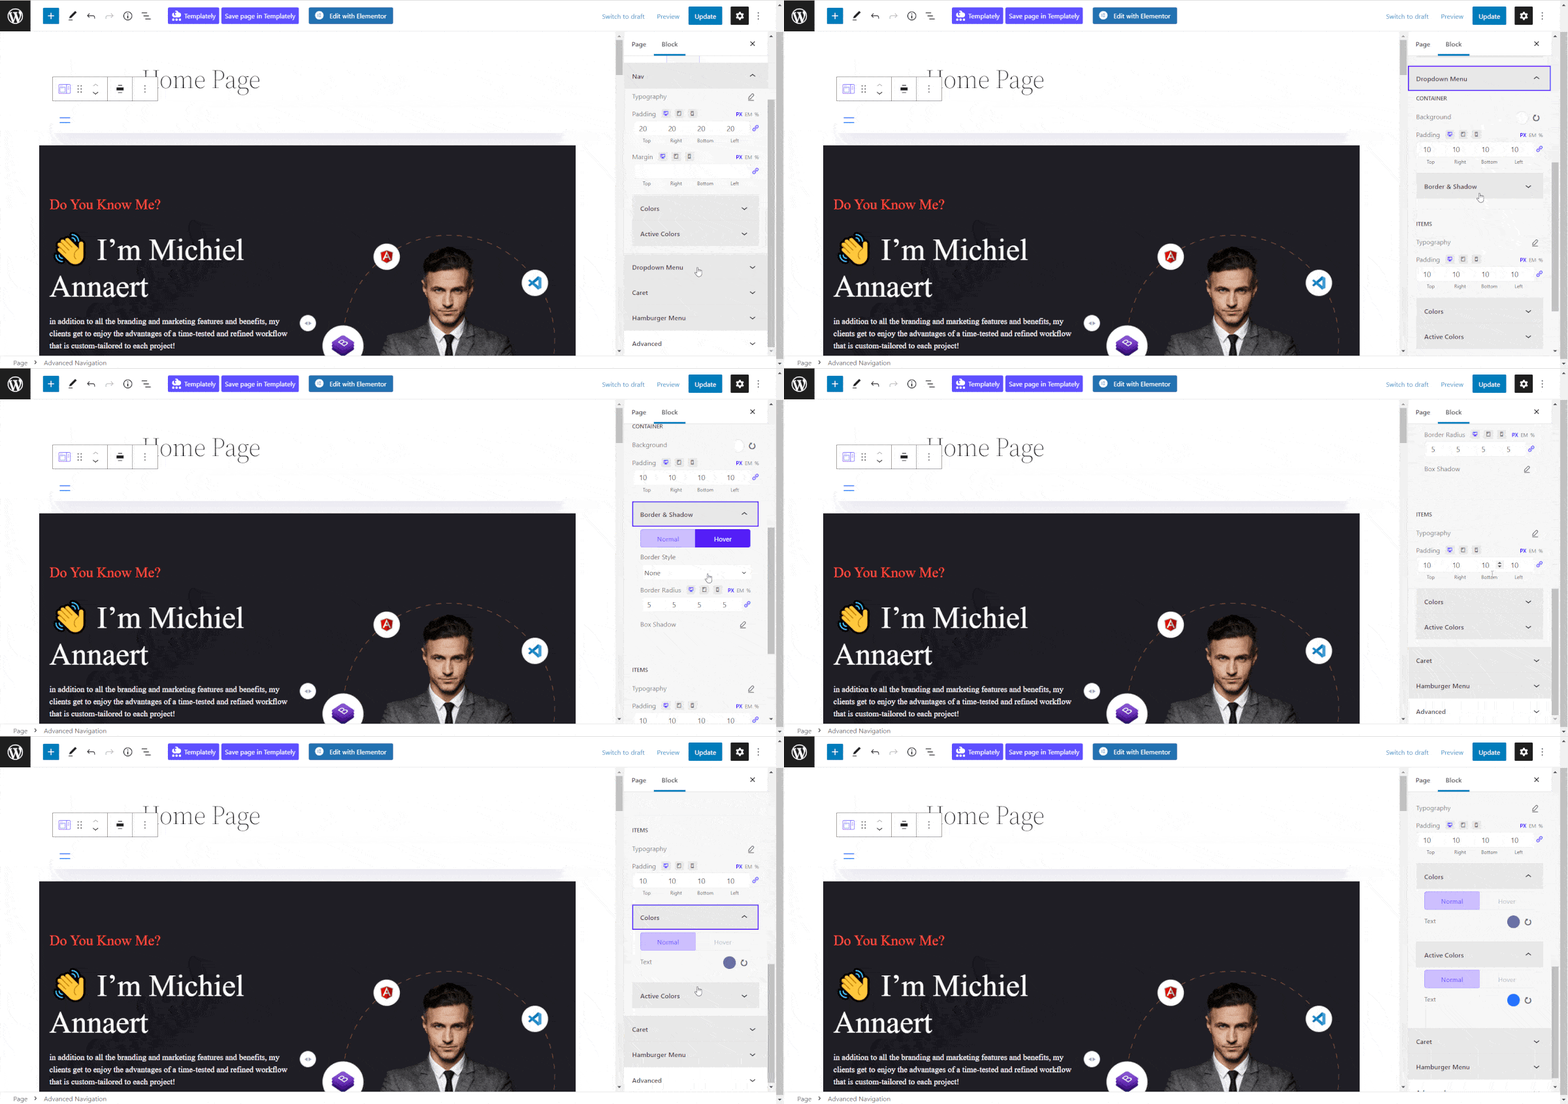
From the Dropdown Menu option, you can personalize the navigation menu container and its items easily. You can style the ‘Background’, ‘Border & Shadow’, and ‘Padding’ for the container from there. Similarly, you can personalize the ‘Typography’, ‘Padding’, and colors easily.
Caret #
The ‘Caret’ option will let you customize the size and color of the drop-down menu indicator icon easily. You can also a hover effect for the Caret from there.

Hamburger Menu #
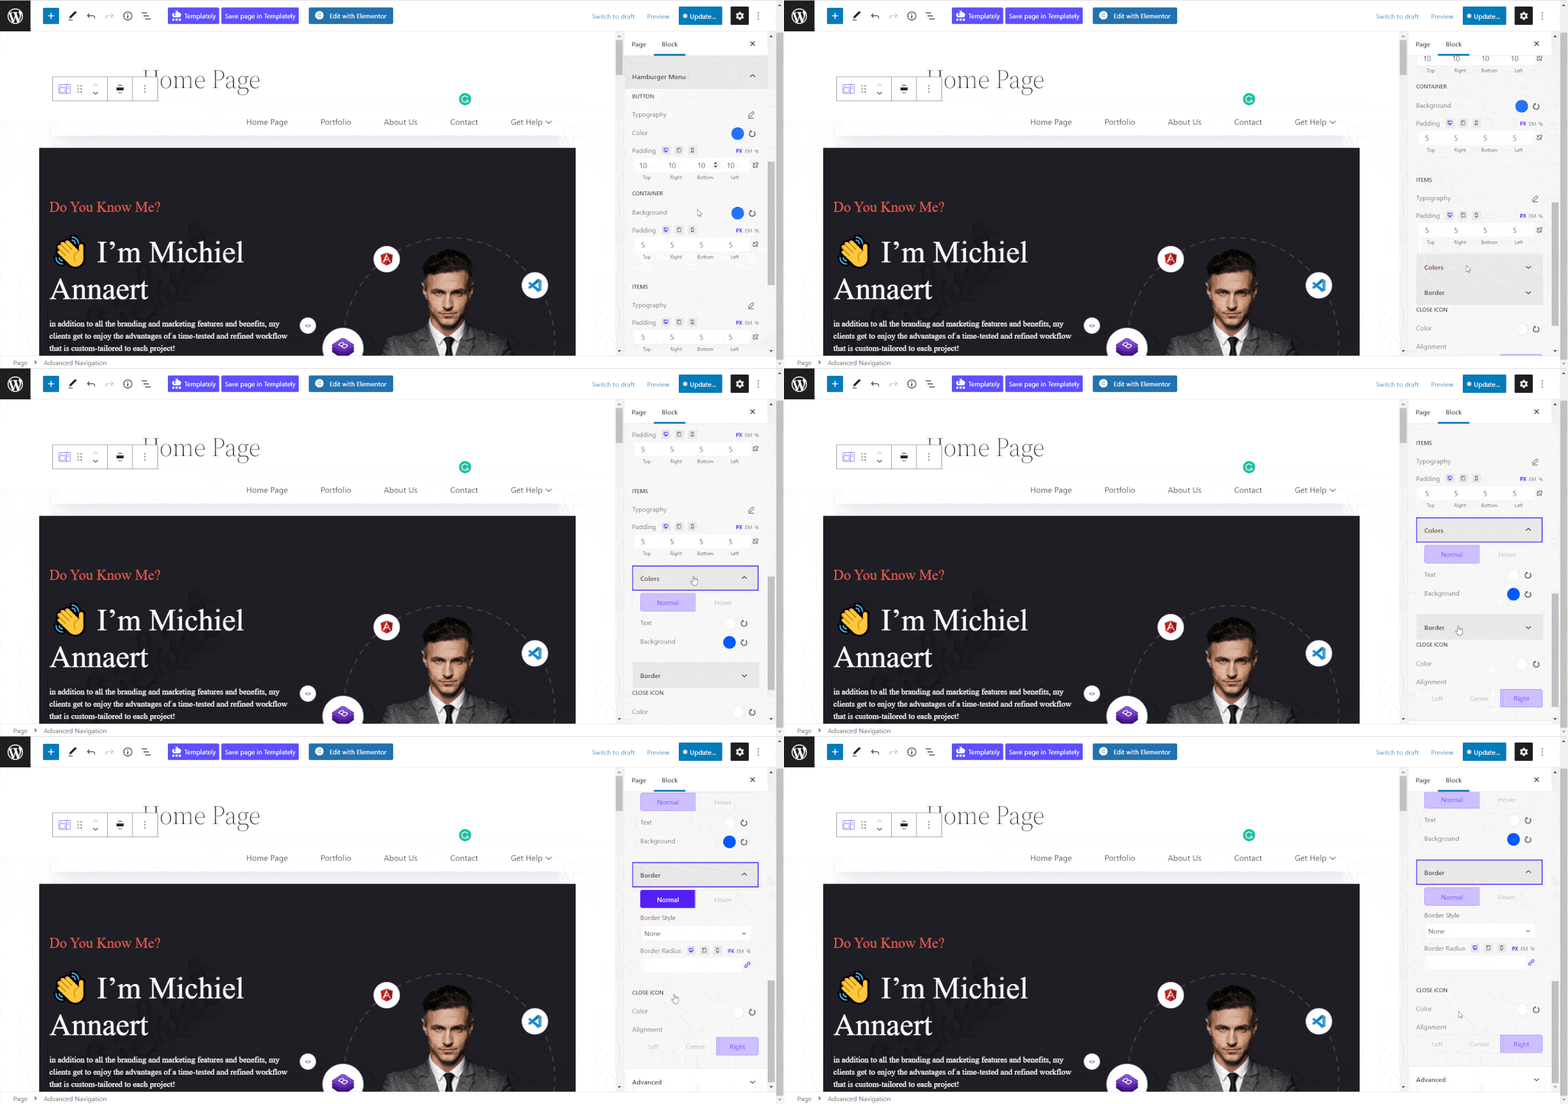
Now, personalize the ‘Hamburger Menu’ from there as well. Adjust the typographies, colors, and paddings for the buttons, container, and items as you want. In addition, you can customize the color and alignment for the ‘Close Icon’ from there.
Advanced #
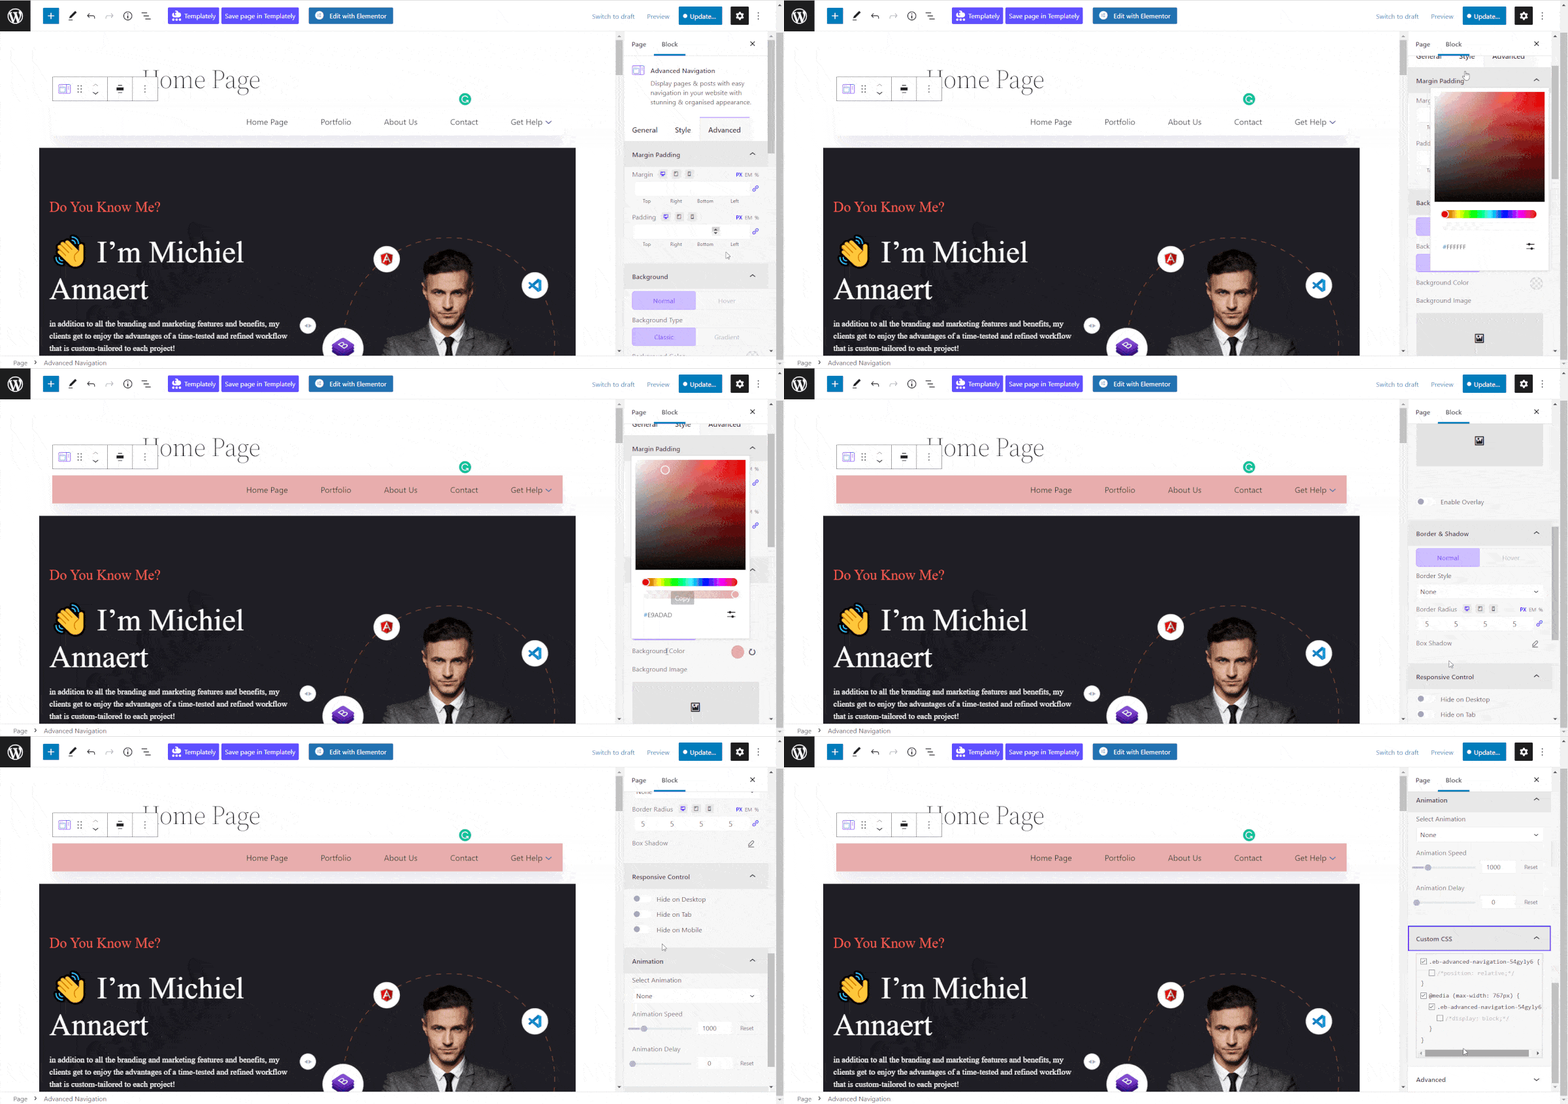
From the ‘Advanced’ tab, you will get all the options for advanced customization for the navigation menu. You can customize Margin Padding, Background, Border & Shadow, Responsive Control, Animation, and Custom CSS. Using these options you can add more styling to the Advanced Navigation block.
Final Outcome #
After making all the changes hit the ‘Update/ Publish’ button and you will see your EB Advanced Navigation block displaying on your website. By following the simple and easy steps, you can add the EB Advanced Navigation block and style it in Gutenberg.

Here’s how you can easily configure and design your EB Advanced Navigation block in Gutenberg.
Got stuck? Feel free to contact our support for further assistance.


