Want to share your stories in an interactive way that will keep your readers constantly engaged with a Parallax Slider block? If you do, then you have come to the right place. To help you create websites that instantly grab attention, today, we will tell you how you can add a parallax slider to your website with complete ease. So, without further ado, let’s dive into our in-depth guide.

Add Motion Effects To Your Website & Enhance User Experience
Nowadays, motion effects have become part and parcel of the digital world. While surfing the internet, you will find almost every website uses some form of interactive motion effects to showcase content in an engaging way. But why have motion effects become so popular recently? Let’s take a quick glimpse below and find out why you should add motion effects to your website:

Adding motion effects to different forms of graphics is a great way to deliver an interactive user experience. Using it, you can easily bring people’s attention to your content and keep them engaged for a long time. So, whenever you add motion effects to your images, they will be visually appealing to your visitors. They will get easily engaged with the visuals on your website, and instantly boost users’ average time spent on your site.
But that’s not all. Using motion effects, you can easily make your content stand out from the regular styles that we can usually see on other websites. It will add a creative touch to your content and web pages, and enhance your storytelling. So, while adding motion effects to your website, your content will become rich, bringing readers back to the articles on your website again and again.
Boost User Engagement With Parallax Slider Block
One of the biggest challenges that digital marketers and website owners face is keeping the users engaged with their websites. According to Contentsquare benchmark data, the average bounce rate for an eCommerce website is 47%. This number suggests that almost half of the visitors don’t spend more than 1 or 2 seconds on a web page. Therefore, experts suggest adding interactive content to the web pages.
The Parallax Slider, as you can already tell from the name, offers an interactive way of showcasing images on your site using a slider format that constantly keeps your images and visuals dynamically moving. Thus, it could be a great tool for keeping your visitors on your website and reducing the bounce rate.
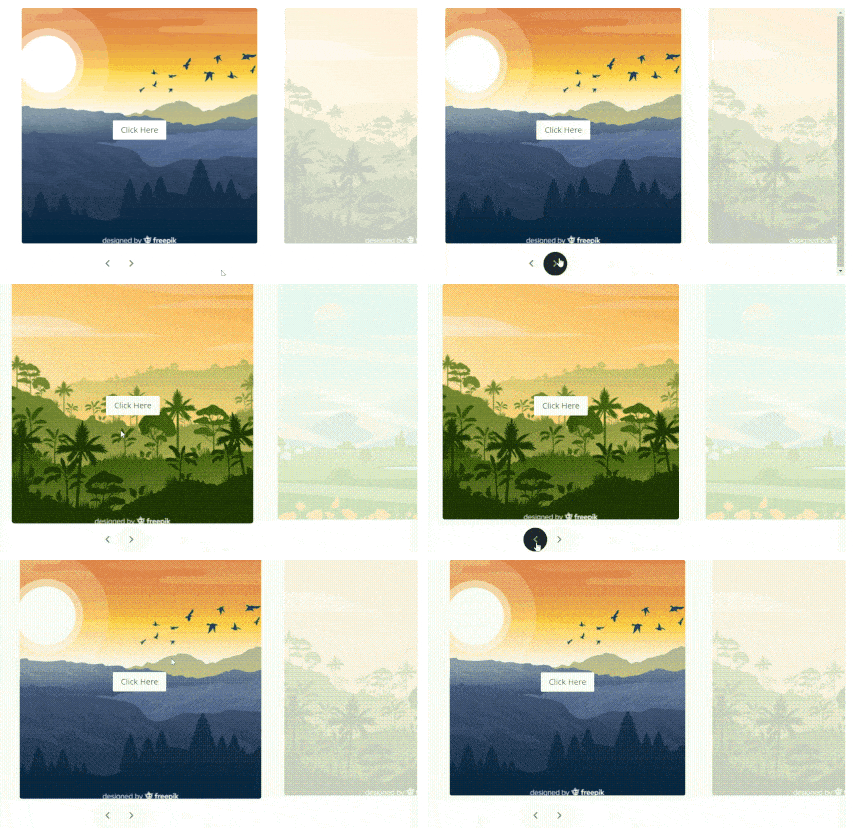
Adding a Parallax Image Slider can bring a unique design to your website. You can input this slider on your landing page, sales page, or even on your blogs – wherever you think you need a way to easily grab your visitor’s attention.
Moreover, the Parallax slider can make your visitors curious about the product or service that you are showing on your website. It usually comes with an option to add your high converting copies and showing in a visually appealing manner. So, you can easily catch the visitors’ attention and increase your user engagement.
Add Parallax Slider Using Essential Blocks Within A Few Clicks: Step-By-Step Guideline
While you can use different methods to add Parallax Sliders on your website, some of them are too difficult for non-techie people, and others may cost you quite a lot of money or even demand designers to be hired. But not to worry, with this blog, we will introduce you to the simplest method that you can use to add Parallax Image Slider to your WordPress website by using the Gutenberg editor.
Therefore, you need to have the Gutenberg editor activated on your website. The good thing is Gutenberg is currently the default editor for WordPress. Using this block editor, you can publish dynamic content at ease. Besides, Gutenberg offers amazing page-building features for free. However, to fuel up your default WordPress editor you need to install and activate a Gutenberg block library on your website. So let’s find out how you can effortlessly add a Parallax Slider to your favorite block editor.
⚡ Essential Blocks For Gutenberg: The Ultimate Gutenberg Block Library
Essential Blocks For Gutenberg is an all-in-one block library that you can use to supercharge your default WordPress editor. Using this ultimate block library, you can enhance your Gutenberg experience and publish stunning content on your website. It comes with more than 35 amazing blocks along with a free block that lets you add Parallax Slider to help you create stunning web pages.
Within a few clicks, this block library will let you add Parallax Slider to your website. Now, before going to the step-by-step guideline, you need to install and activate Essential Blocks on your website first.

Step 1: Add Parallax Slider Block To Gutenberg Web Page
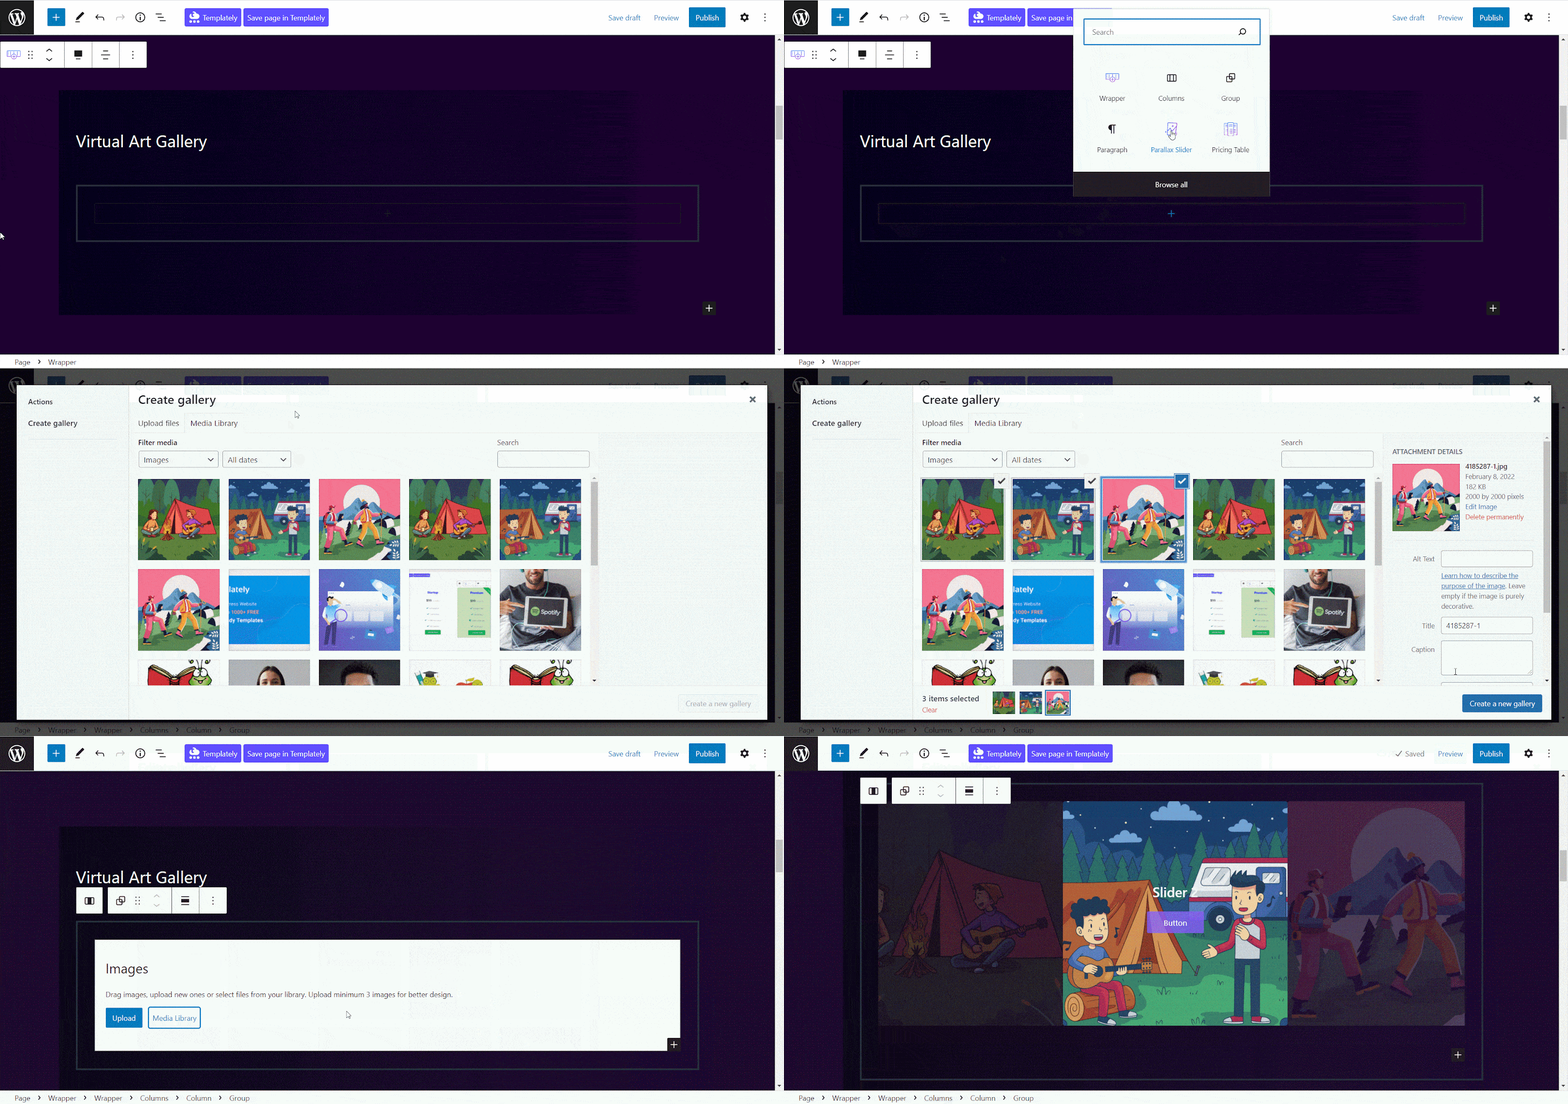
Once you have activated the Essential Blocks for Gutenberg plugin on your website, now you have to insert the Parallax Slider block to your webpage. Hit on the ‘+’ button and search for ‘Parallax Slider’, then click on it. Within a few seconds, this block will appear on your web page.
After inserting the Parallax slider, now you have to add images to the slider. For the tutorial purpose, we have added 3 photos from the media library. You can also add images from the media library or upload images to add to the slider quickly and easily, as shown below.
Step 2: Adjust The Slider With Your Web Design
This Parallax Block from Essential Blocks for Gutenberg is completely customizable. So, you can easily adjust the height or slide gap and tweak parallax softness, and make it more attractive by adding your own touches.
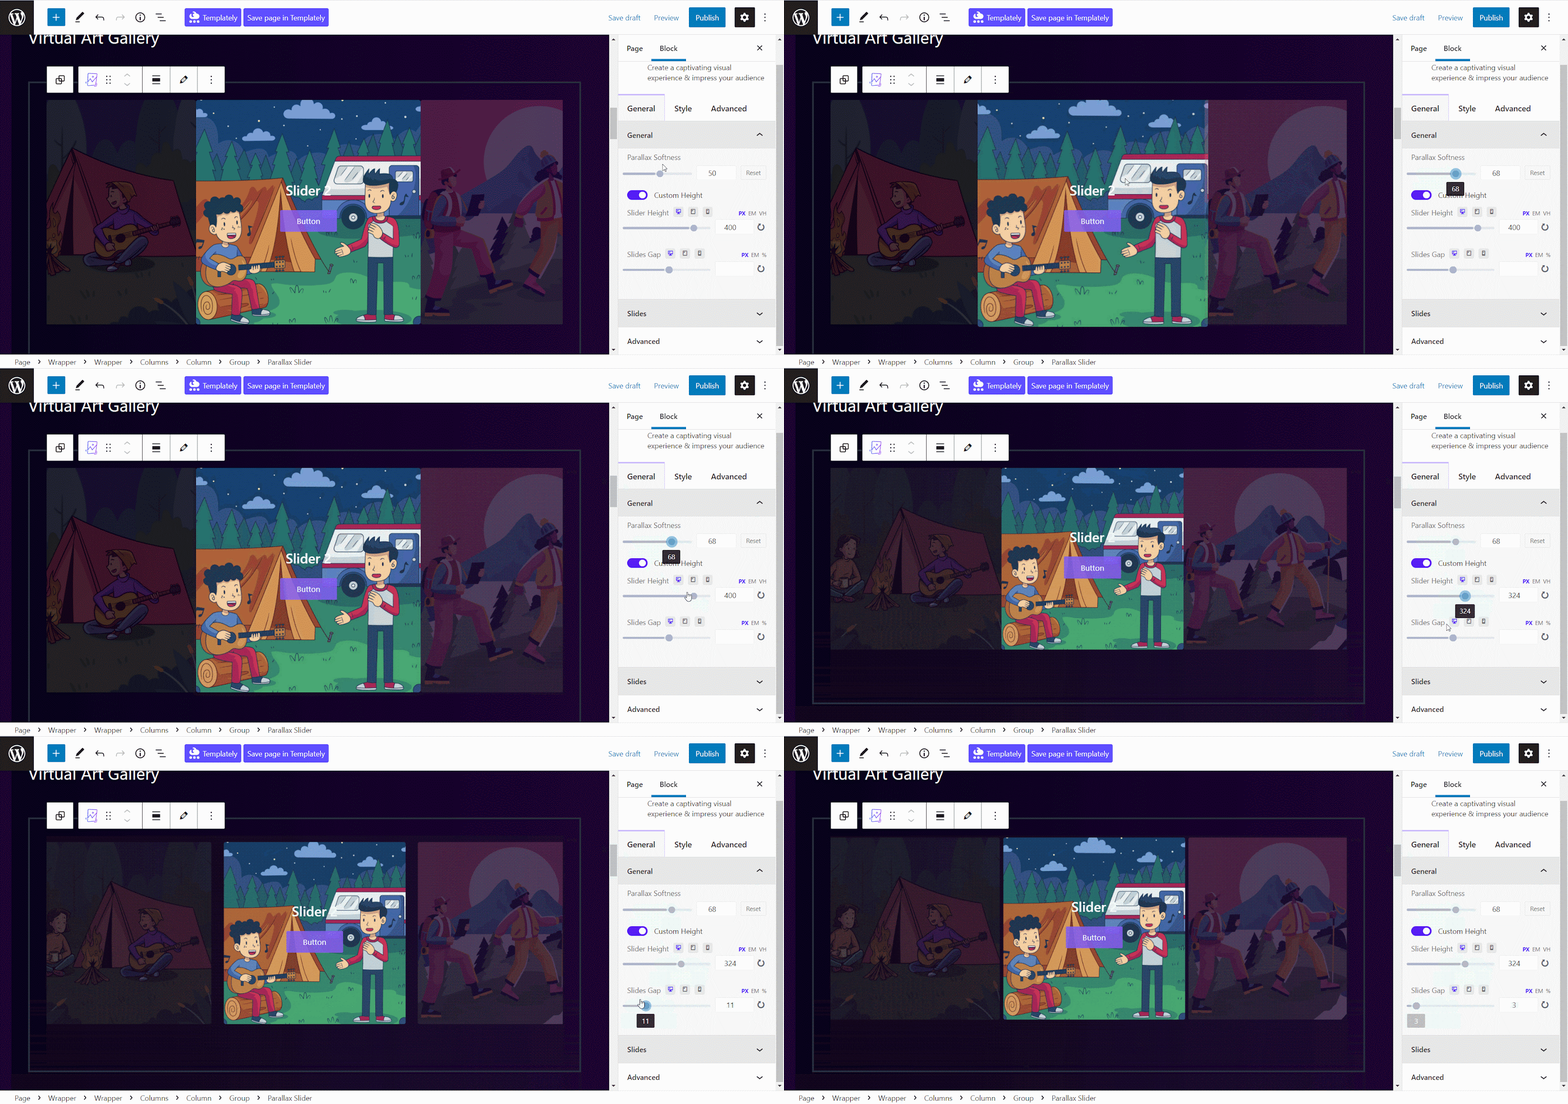
This effective tool for Gutenberg also comes with Call-To-Action buttons that could be more engaging than the non-dynamic regular CTA buttons. While using this tool, you can easily lead your visitors to the CTA button and increase your conversion rate. Thus, using a Parallax Image Slider instead of a conventional button could work more effectively in bringing in more leads and conversions for you.
You will find the option to create CTA buttons for each of your images from the slider section. You can easily add a title for your image and text for your CTA button from the block editor panel, add necessary links and take your readers to your target URLs in no time.

Step 3: Style Your Parallax Slider Block Appearance
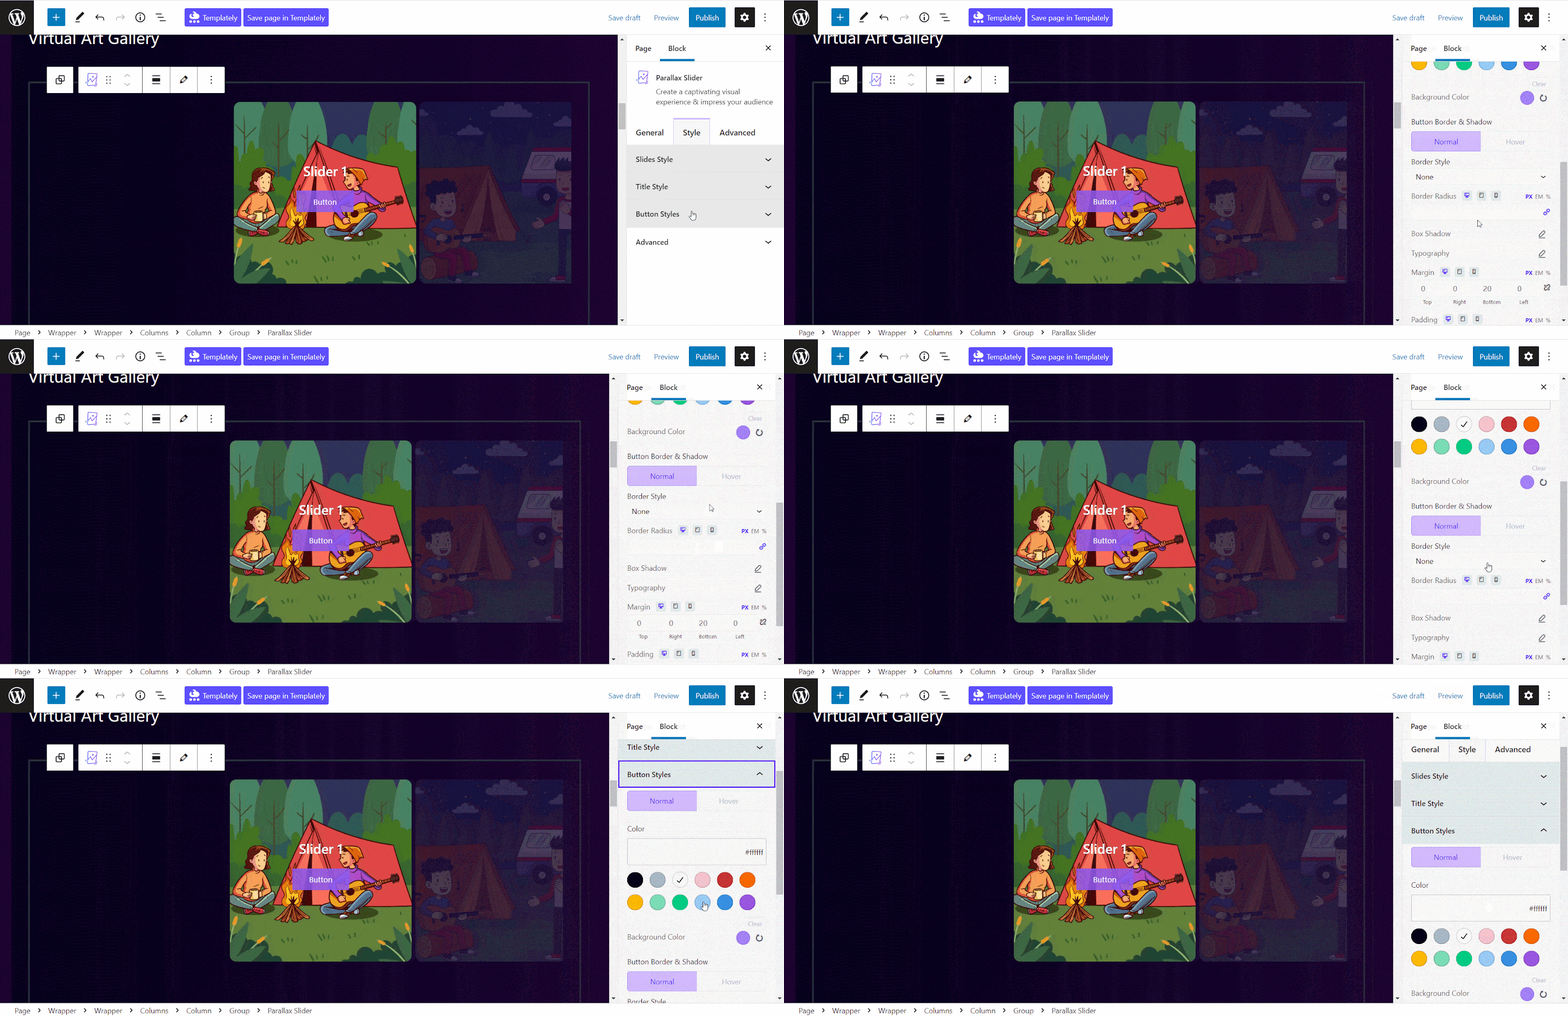
Now, you can add style to your WordPress Parallax Slider from the style section without any hassle. Go to ‘Slide Style’ to adjust the content alignment, padding, and border-radius for your sliders to match it to the design and style of your web page or brand design.
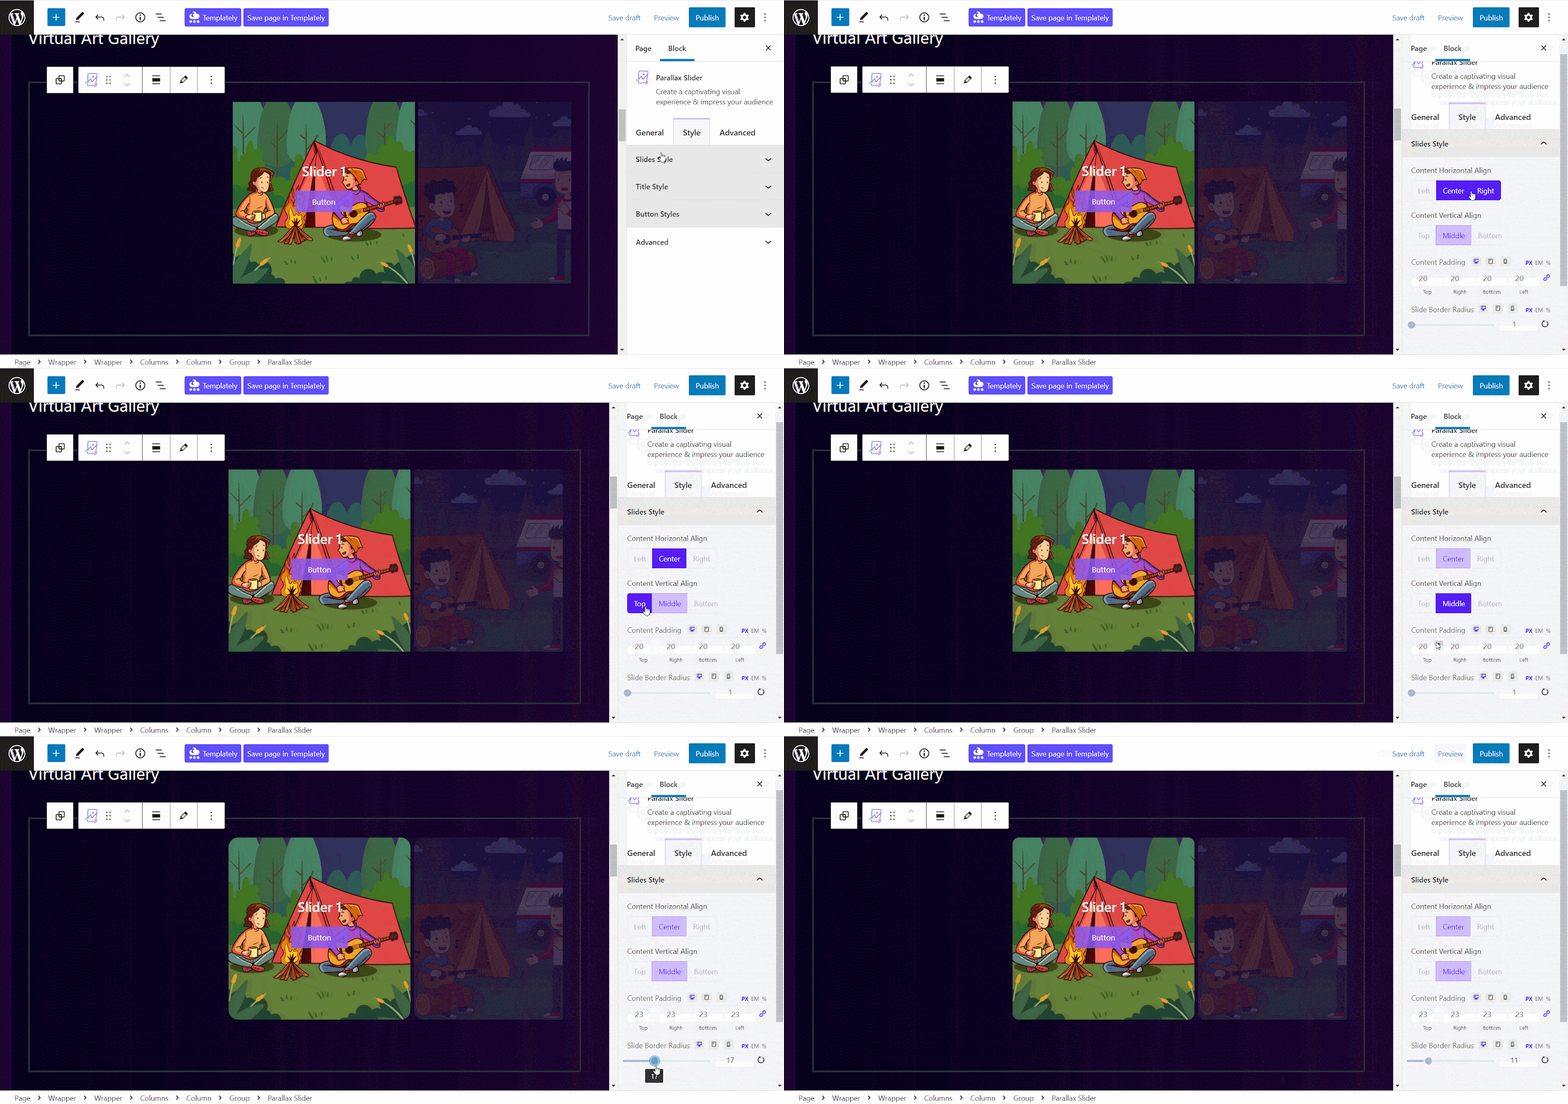
Then, go to ‘Title Style’ to change the color, typography, and margin of your slider’s title. You can even adjust the background color for slide titles to make the slider images pop more and grab visitors’ attention instantly.

From the ‘Button Style’ section, you will find the option to adjust the text and background color, typography, for the CTA button if you have chosen to add one to your Parallax Carousel Slider. You can add a hover effect on the CTA button and tweak the border style. Besides, you will get the option to adjust the margin and padding for the slider boxes and add shadow without any hassle.
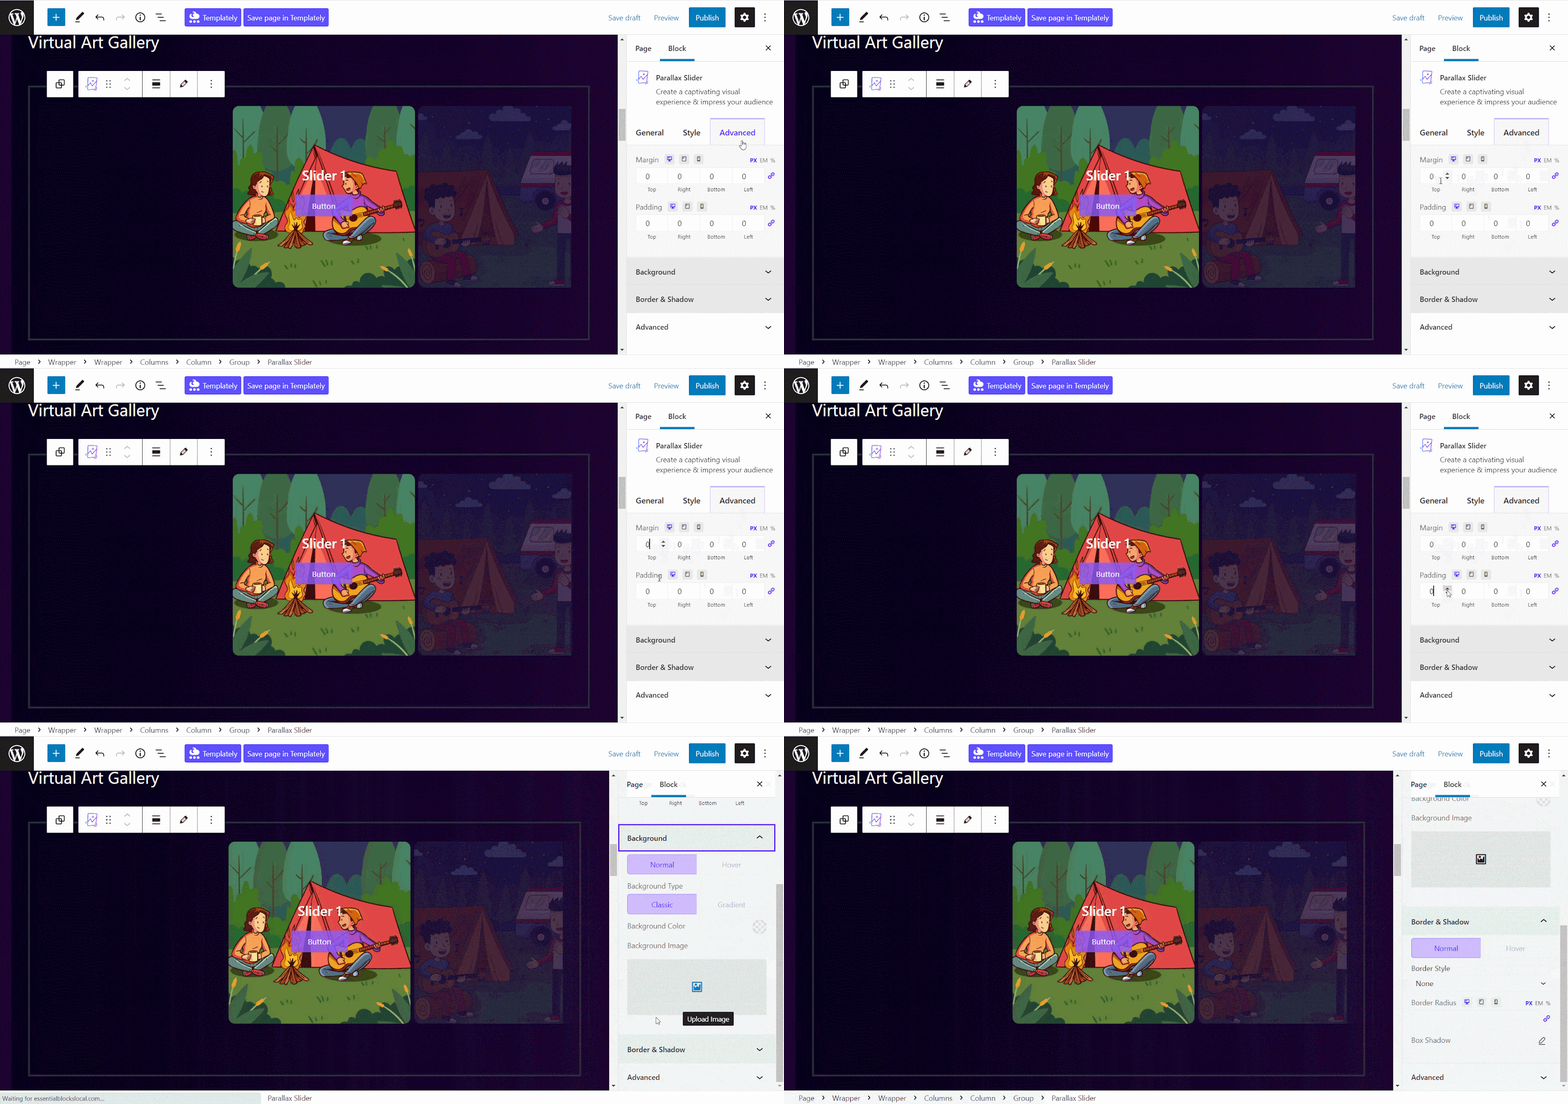
Also, from the ‘Advanced’ section, you could adjust the margin and padding of your WordPress Parallax Slider easily. You could tweak the background and border of the slider and add extra personalization to it. This way, you could easily move this block and adjust your web design without any hassle.
Effortlessly Add Engaging Motion Effects With Parallax Slider Block
Once you are done styling your Parallax Slider on Gutenberg editor, now is the time to publish it on your stunning new, dynamic webpage. You can take a look at this parallax slider that we made while showing you the guideline to visualize how the final outcome of your customizations will look.
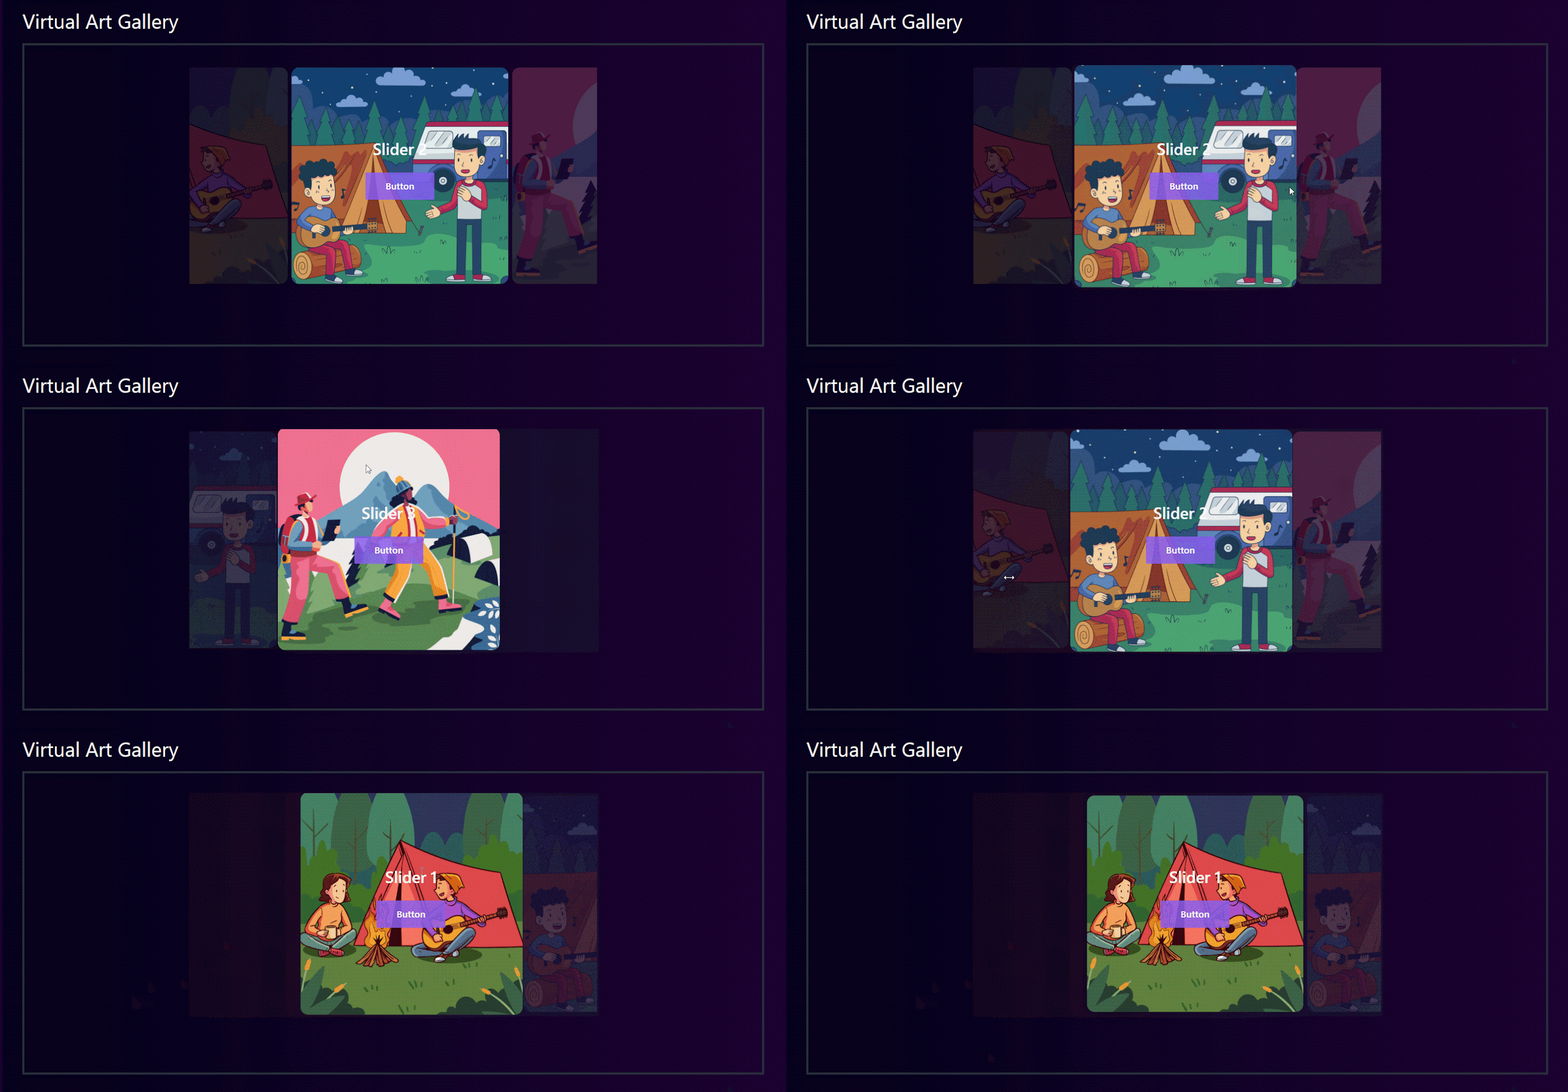
Using Essential Blocks for Gutenberg, you can add Parallax Slider to your website within just 2 minutes in the simplest steps. Adding this Parallax Slider block, you could easily add motion effects to your images, which increase your user engagement. So, install Essential Blocks right now and add motion effects on your website and supercharge your CTA Buttons.
Enjoyed this tutorial? Feel free to subscribe to our blog for more tips and tricks, and don’t forget to join our Facebook community.

![Guide for WooCommerce Checkout Flow Optimization [2026] 26 woocommerce checkout](https://essential-blocks.com/wp-content/uploads/2026/01/WooCommerce-Checkout_-A-Complete-Guide-for-2025-150x150.jpg)


