In today’s world, visual media content has become the most efficient and effective way to connect to your target audience, and icons have made their way to one of the most powerful visual tools. So, choosing the right one for your website content is necessary but a bit difficult, and that’s where Font Awesome comes in. You can use Font Awesome icons, which play as the perfect icon solution for your WordPress site.

Font Awesome is a rich library of free icons. You name anything, and you will find the icon of it on Font Awesome, that too in all possible icon sizes, shapes, colors, and much more! Sounds fun? Well, it is fun. Let’s dig deeper into it.
✨ Have A Stunning WordPress Website With Font Awesome Icons
Icons play an active role in web design. They may seem small, but when used correctly, icons can express the gist of your content and reinforce your brand. They enhance the navigation and promote user satisfaction. So, designers have to choose the perfect icon for their website design. Icons should be metaphorically similar to the content so that anyone can easily understand what the content is about.

Font Awesome is a font and icon toolkit. In today’s world, Font Awesome has become all the designers’ go-to places for icon searches. You can find all possible types of icons here. The use of Font Awesome icons significantly reduces your page load time, which improves your website’s user experience. It offers scalable vector graphics, which means all the Font Awesome icons look stunning at any size. You will get infinite opportunities when it comes to styling your Font Awesome icons. This Awesome tool is the perfect choice for your WordPress icons.

Font Awesome icons are displayed as fonts which is an efficient way to display images. Designers love icons as fonts due to available flexibility and styling opportunities. Fonts allow rendering Font Awesome icons sharp as the device allows. So the designers don’t need to fuss over creating retina graphics as Font Awesome provides high-quality iconography on every device. Oh forgot to mention earlier, all of the fonts are responsive too!
According to Wikipedia, as of 2020, Font awesome icons were used by 38% of sites that use third-party font scripts. These amazing statistics place Font awesome in second place, just after Google fonts. These figures only validate its popularity.
🔎 Which One Would You Choose: SVG Or Web Font?
SVG and Web Font are two technologies used by Font Awesome icons. Web Font is with Font Awesome since the early days. And SVG in the new addition to it. Some people always think that the newest one is the best one. But that’s not always true.
Both of these technologies have their strength and weakness. You need to decide which one to work with according to your project demands. If you are not sure about which one to choose, go with the default settings.
Web Fonts refer to fonts that are made with icons. Font awesome pairs up the icon font with CSS. It is a reliable and already-established technology for Font Awesome, which is a big reason many people prefer to use it.
If you want to showcase your icons without HTML, you can do it as Web Fonts can be used in pseudo-elements in CSS. Even with these facilities, Web Fonts is not an ideal option when it comes to auto-accessibility (except in a kit). It is also not flexible enough for some advanced styling.

SVG refers to vector images. Vector-based images render using the browser’s engine. Font Awesome pairs up it with javascript to do the magic. It’s a good choice for a javascript-based app. It offers some interesting features like masking, layering, and power transforms. You can easily resize the icons, create subsets with just the selected icon, and much more.
With all the interesting features, it has its drawbacks too. It won’t offer you any native rendering unless it is paired with Font Awesome JS package.

Just weigh the pros and cons of each technology and decide which one to work with. And display wonder icons on your website.
💡 Easy Methods To Use Font Awesome Icons On Your WordPress Site?
There are many ways you can use Font Awesome icons on your WordPress website. No matter your technical expertise, you can easily add the Font Awesome icons without any complexity. In the following section, we will talk about a few methods to add Font Awesome icons. Let’s dig deeper into the Font Awesome icons embedding.
📖 Method 1: How To Use Font Awesome Icons With Plugin On WordPress?
Font Awesome has officially introduced its plugin for WordPress sites of the same name. Now things have gotten easier with Font Awesome. With the plugin, you can add Font Awesome icons in WordPress in multiple ways. You can add icons to WordPress with the new Icon Chooser, shortcodes, or HTML snippets.
Now get ready to display your Font Awesome icons. First, we are giving an overview of the classic pattern by which you can add Font Awesome icons in almost all WordPress settings.
Step 1: Install And Activate The Plugin
First, log into your WordPress site and navigate to ‘Plugins’ → ‘Add New’ from the left panel of the dashboard. Then, on the search field, go for ‘Font Awesome‘ and hit enter. Then Install and Activate the plugin, and you are ready to start your process.

Step 2: Configure Font Awesome
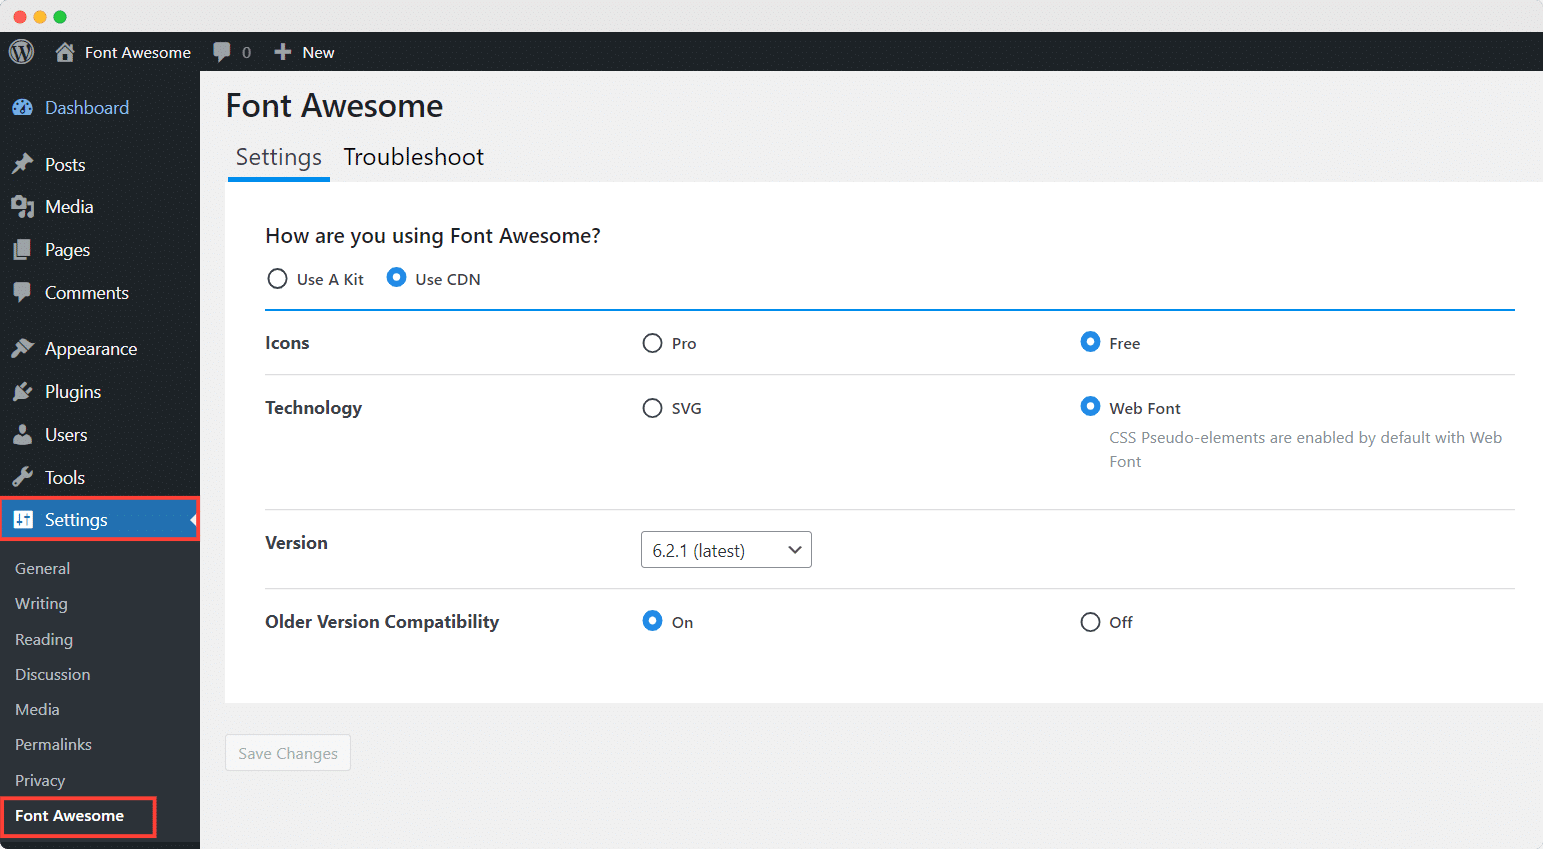
After successful activation of the plugin, you can check the plugin configuration of the plugin. To do that, navigate through ‘Settings’ → ‘Font Awesome,’ and you will see the default settings of the plugin for free users.

If you want, you can make the necessary changes here and save it. If you are a premium user, then toggle the ‘Use A Kit’ option. Then collect the API token and put it in the ‘API Token’ field. To collect the API token, go to your Font Awesome account page and generate and copy your API token. All done! Now you will be able to enjoy your Font Awesome premium service with the plugin.

You can also choose between ‘Web Font’ and ‘SVG’ technology for your Font Awesome icons from the settings. Have a Clear idea about them and choose the perfect one for you.
Step 3: Go To Font Awesome Official Website
Once the plugin setup is done, go to the official website of Font Awesome. Navigate to the icon section from the navbar. Search for your desired icon. Select the preferred icon from the search result.

Step 4: Copy The Code Of Your Selected Icon From Font Awesome
Now click on that selected icon from the search result. And then, you will see the code for the icon. Copy it!

Step 5: Display Font Awesome Icon Into Your WordPress Site
Then go back the where you want to add the image and select the ‘Custom HTML’ block. Then paste the copied code.
After saving the code and updating your WordPress site, go to the front end and see whether your intended icon is displaying. If all these steps are followed without any error, then the selected icon should be displayed.
In the figure attached below, we can see a WordPress logo as we have done the procedure for the WordPress icon. Now add your icon!

You can also do it with shortcodes. You will find a default ‘Shortcode’ block. Select that one and write the shortcode ‘[icon name=”icon_name”]’ in this format, save it, and check it from the front end. Make sure to use the perfect icon name from the Fond Awesome official website and write it in the shortcode.

Here we have used a shortcode to add a camera icon on our site. So, we wrote the shortcode ‘[icon name=”camera”]’ in the shortcode block, and everything was done. The icon has been added to our site.

You can also use the shortcode ‘[icon name=”icon_name” prefix=”fa-“]’ in this format. The prefix is the style of the icon. Of course, it will work just fine even without the prefix, as we have already explained before. If you don’t use the prefix, it will still render the icon for you but with the default solid style.
You can also add more styling features to your WordPress icons. You can resize your icons to get them in perfect sizes, you can rotate your icons to give them a different orientation, and also add animation to your icons. To add animation to the icons, we have used some instructions in the code after the prefix, ‘[icon name=”yin-yang” prefix=”fas” class=”fa-2x fa-spin”]’.

One thing to keep in mind is that the shortcodes for this plugin act like hit-and-miss cases. Some icons will be displayed perfectly fine, and some might not be displayed. So it’s recommended to use the ‘Custom HTML’ block.
For example, here, we have used shortcodes for both WordPress and Camera. The Camera icon was displayed, whereas the WordPress icon wasn’t. But the WordPress icon was displayed when we used it with HTML code, as mentioned before.

📖 Method 2: Simplest Way To Use Font Awesome Icons With Gutenberg
Font Awesome plugin also provides you with an interesting feature. Now with the plugin, you can directly search for the Font Awesome icons from your WordPress site if you don’t want to travel back and forth to Font Awesome website to copy-paste the icon code. Let’s discuss the step-by-step guideline for that.
Step 1: Install And Activate The Font Awesome Plugin
You need to install the official plugin of Font Awesome and activate it. The process is already explained in the previous method.

Step 2: Go To Where You Want To Add The Icon
Navigate to the page or post where you want to add a Font Awesome icon. Select the exact location where you want to place the icon.
Step 3: Navigate To The ‘Font Awesome Icon’ Option
If you are working with WordPress Gutenberberg, then from the extended format bar, you will find the ‘Font Awesome Icon‘ menu option. If you are using Classic Editor then you will find it above the format bar.

Step 4: Search For The Icon And Add It
Clicks on the ‘Font Awesome Icon’ option from the dropdown, and it will directly open the Font Awesome search option for you in an exactly similar way to the website. Just search for your Font Awesome icons via the search bar. Select any icon you wish to add. And it is done. Update your WordPress page, and check the Font Awesome icons from the front end!

Method 3: How To Manually Use Font Awesome Icons On Your WordPress Site?
If you don’t want to use the plugin and want to use Font Awesome icons manually on the WordPress site, you can do that too. You will have to add PHP code to your WordPress theme’s functions.php file. For example purposes, we are using the theme Flexia.
Step 1: Navigate To Theme’s Function.php File
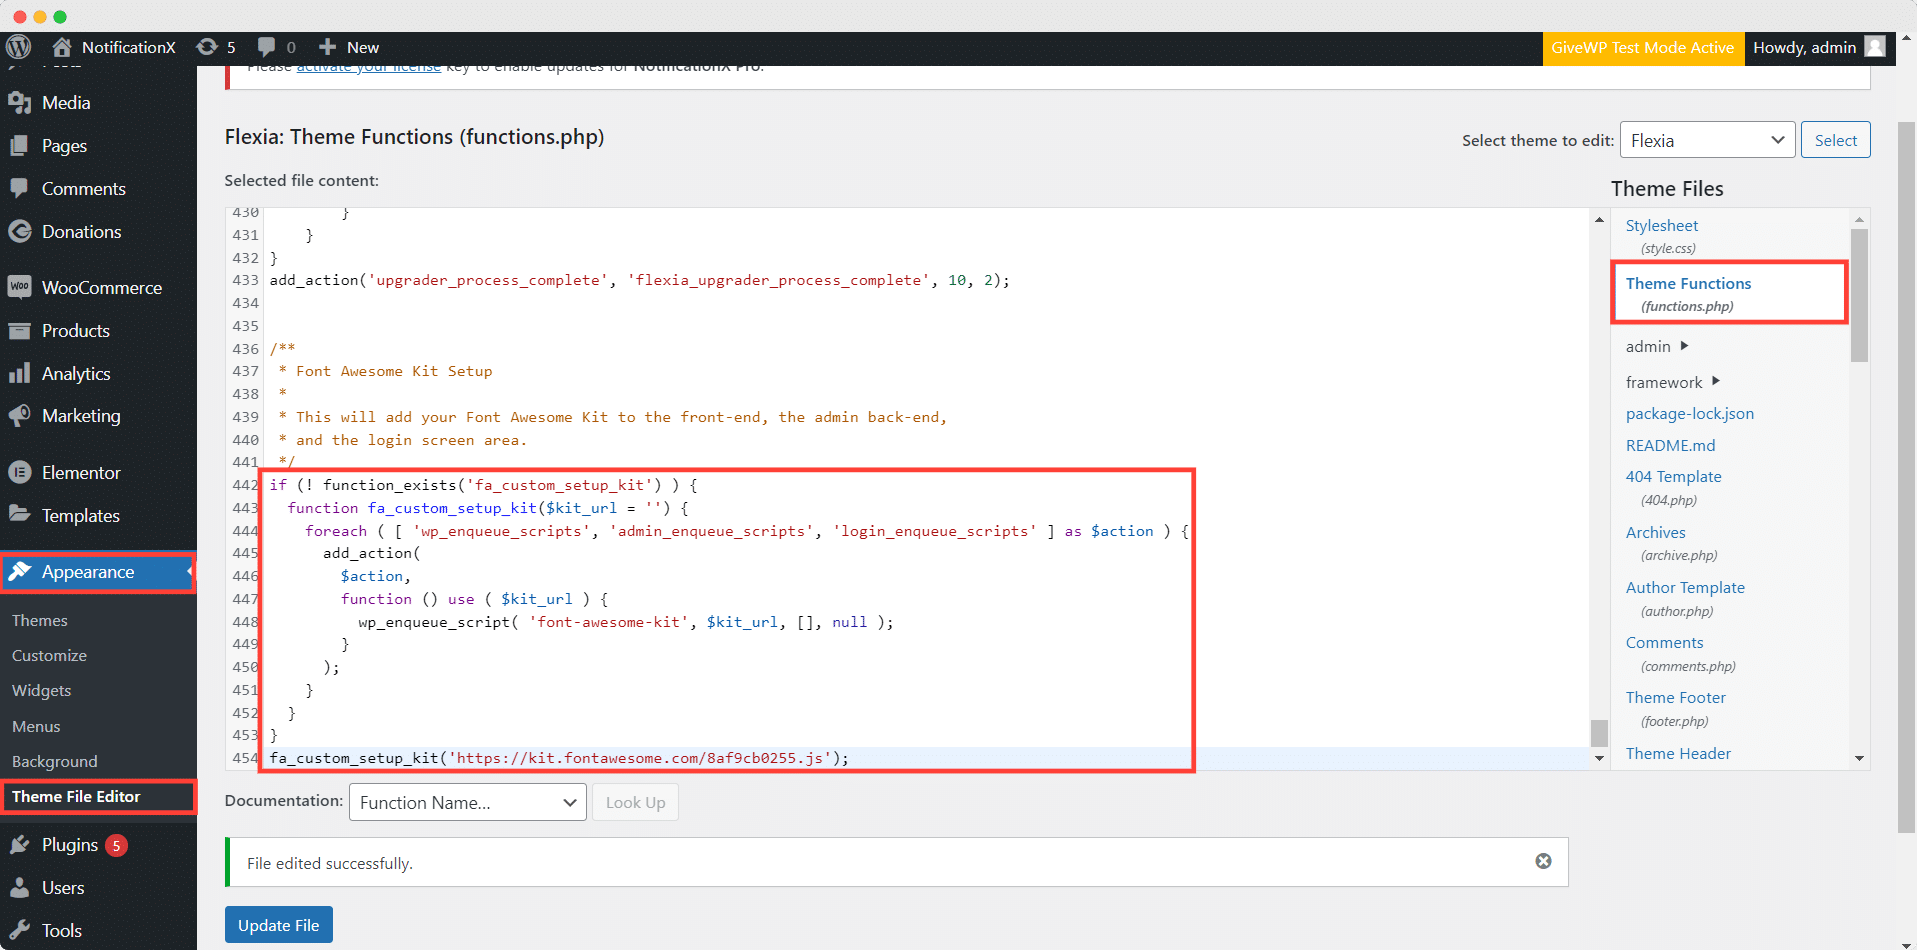
First, go to your ‘Appearance’→’Theme File Editor’ and open your ‘functions.php’ file from your WordPress dashboard. You need to add code here, for your Font Awesome integration.

Step 2: Add The Necessary Code To Integrate Font Awesome
Here copy and paste the following code into your ‘functions.php‘ file. And you are halfway done!
| /** * Font Awesome Kit Setup * * This will add your Font Awesome Kit to the front-end, the admin back-end, * and the login screen area. */ if (! function_exists(‘fa_custom_setup_kit’) ) { function fa_custom_setup_kit($kit_url = ”) { foreach ( [ ‘wp_enqueue_scripts’, ‘admin_enqueue_scripts’, ‘login_enqueue_scripts’ ] as $action ) { add_action( $action, function () use ( $kit_url ) { wp_enqueue_script( ‘font-awesome-kit’, $kit_url, [], null ); } ); } } } |
Then you will have to call the above function with your kit code. To do that copy-paste the following code into your functions.php file. You are not done yet!
| fa_custom_setup_kit(‘https://kit.fontawesome.com/yourkitcode.js’); |
Go to your Font Awesome account and collect your kit code. Then paste the kit code of the previous code’s ‘yourkitcode‘ part. Then save the changes by clicking the ‘Update File’ button.

Step 3: Add Font Awesome Icons To Your Website
And now you are done. Now you can use Font Awesome icons on your WordPress site, wherever you want to add them, with the code that Font Awesome provides for each icon, just as explained in the first method.
✨ Are You Ready To Build A Beautiful Website With Font Awesome?
This whole blog was to make the procedure of embedding the Font Awesome icons to your WordPress site clean, clear, and interesting for you. We also added some tips and tricks to help you have a beautiful website. Did you find the blog helpful enough? If it is then quickly subscribe to our blog to get more tips and tricks. You can also join our Facebook Community to get updated information new updates.
>
![Guide for WooCommerce Checkout Flow Optimization [2026] 41 woocommerce checkout](https://essential-blocks.com/wp-content/uploads/2026/01/WooCommerce-Checkout_-A-Complete-Guide-for-2025-150x150.jpg)


