Do you want to keep your visitors engaged with your website? But it is hard to grab their attention and lead them to your Call-To-Action (CTA) button. However, using an interactive flipbox could be a quick way to solve this! Today, we are going to show you how to create an interactive flipbox on your WordPress without a single line of code.

What Is An Interactive Flipbox?
An interactive flipbox is a type of dynamic content that moves with a flipping animation on mouse hover. It’s a great way to create engaging content on your website and stunningly showcase texts and images. With an interactive flipbox, you can present your content in a manner that will catch your visitor’s attention.

Why Should You Use Interactive Flipbox On Your Website?
Nowadays, getting traffic on the website is not enough to become successful in online marketing. You need to increase your engagement and convert your visitors into customers to grow your business. Let’s see how flipbox can make a difference on your site below.
🎯 Increase Engagement: Flipbox is a great way to increase engagement on your website. Because adding an interactive flipbox on your website, can attract your visitors and keep them engaged on your site.
🎯 Supercharge Your CTA Button: Having a catchy Call-To-Action button can make a huge difference for your business. With an interactive flipbox, you can add engaging content with powerful words and interesting images with a CTA button at ease. So, using flipbox you can easily fuel up your CTA button without any hassle.

🎯 Showcase Detailed Information: Using Flipbox you can easily showcase detailed information about your product or service. On the one side, you can show the image and on the other side, you can add text and let your customers interactively learn more about your product.

🎯 Enhance Click-Through Rate: Increasing the click-through rate is vital for any website. Using Flipbox to showcase your website content can help you engage site visitors. Once your visitors are hooked on your website, you can easily lead them to take immediate action.
🎯 Reduce Bounce Rate: Right now, visitors prefer interactive websites rather than static websites. So, whenever a visitor comes to your website, and they find nothing is interactive on your website, they will probably leave and go to another website. This will increase bounce rates. But with an interactive flip box, you can make your site visitors spend more time on your website and thus reduce bounce rates.
Things You Will Need To Create Interactive Flipbox In Gutenberg
Creating Flipbox is super easy on the Gutenberg page editor. You don’t have to be tech-savvy to create a flip box in Gutenberg. Moreover, no need to use a single line of code, to create this block on your WordPress website. Before going to the step-by-step guideline make sure you have downloaded and installed the following block library on your website:
🎯 Essential Blocks for Gutenberg: Before we start, you need to install and activate Essential Blocks on your WordPress website. This plugin is an ultimate Gutenberg blocks library, which will supercharge your default WordPress editor with stunning blocks. So, after activating this plugin follow the guidelines below to create a flip box on your website.
Step 1: Install & Activate Essential Blocks On Your Website
Navigate to your WordPress dashboard, then go to ‘Add Plugins’ from the ‘Plugin’ tab. Search for ‘Essential Blocks for Gutenberg’ and then just click on the ‘Install Now’ button.
Once the installation is completed, click on the ‘Active’ button. Then, the Essential Blocks for Gutenberg plugin will be activated on your WordPress website and you can easily add the flipbox to your site.
Now, you need to add a new page to your WordPress website. You have to click on the ‘+’ icon, and then find the flipbox block. After clicking on the flip box block, it will be inserted automatically on your web page. Now, you can start customizing content and style.

You can easily edit both sides of this flip box by clicking on the Front and Back options from the ‘Selected Side’ section. If you click on the ‘Front’ option there, it will be activated for customization. Similarly, by clicking on the ‘Back’ option, you can activate this side for editing.

To start customizing your flip box, you need to click on the ‘flipbox Settings’ section. Now, you can customize the Alignment, Height, and Weight from there and make it adjustable with your website. Besides, you can also change your ‘flip box Type’ and adjust the transition speed at ease.

Moreover, you can choose ‘Icon Type’ while making your adjustment. You can either turn off any icon or add default icons or any of your images on the flipbox. If you select the Image option, you will find another section below to upload your Front Image. Likewise, you will find a ‘Front Icon Settings’ section below to make changes to your logo.

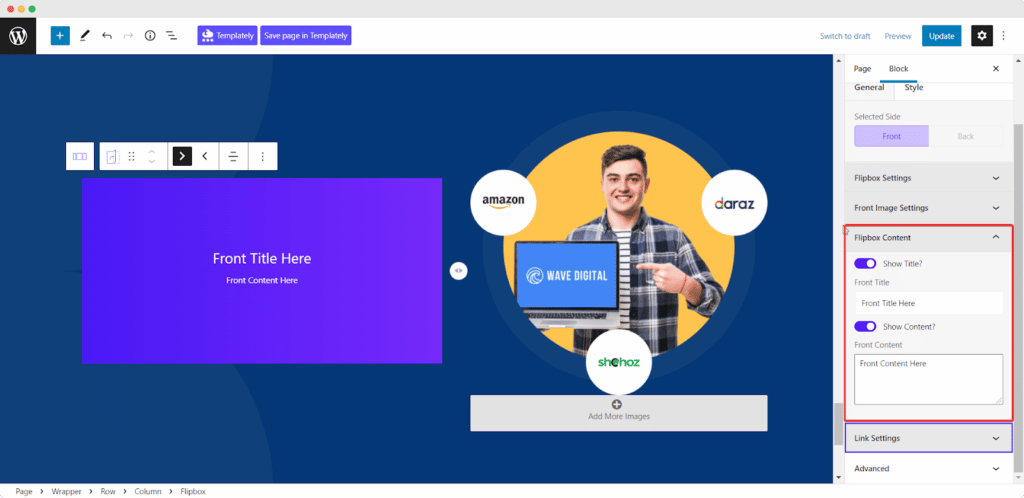
Now, you can make changes to the most important part of this Flipox. Below you will find ‘flipbox Content’ where you can personalize your title and content. You can also turn off the title or content option if you want.

You can also attach links to this flipbox and increase your click-through rate. From the ‘Link Settings’ section, you can decide where to insert your link. You will also get options to tweak your button style if you choose to input any link on the button.

Step 2: Style Your Flipbox
Once you have configured the content settings of your flipbox, now you need to style it and make it attractive to the visitors. To find the string option, you have to click on the ‘Style’ section.

Now, you can change the color of the title, content, and background and make it adjustable with your UI design. Besides, you will also get the option to add a background image on the flipbox there. Moreover, you can also adjust the Margin, Padding, Border style and add Border Shadow easily.

In addition, Essential Blocks for Gutenberg also provides the option to change the typography of your Flip box content. So, you can tweak the font, space, height, etc., and customize as you want.

Once you have done adjusting the front side, now you can change the backside. Similar to the front side, you can make changes in the color and typography at ease.
Step 3: Publish The Flipbox On Your Website
Once you have finished styling the flipbox, you can save it as a draft or click on the ‘Publish’ button to bring this block to your website immediately. That’s how you can create an interactive flipbox in Gutenberg without a single line of code.

Catch Your Visitor’s Attention Using Interactive Flipbox
Using an interactive flipbox to showcase your content dynamically is a great idea for content marketing. You can instantly grab your visitor’s attention right after they come to your website. So, install and activate Essential Blocks for Gutenberg now and stay ahead of your competition.
If you need assistance, you can contact our dedicated support team. Also, if you want to get more tips for Gutenberg, don’t forget to subscribe to our blog, and join our Facebook community.

![Guide for WooCommerce Checkout Flow Optimization [2026] 29 woocommerce checkout](https://essential-blocks.com/wp-content/uploads/2026/01/WooCommerce-Checkout_-A-Complete-Guide-for-2025-150x150.jpg)


