
How To Use The Gutenberg Editor To Create Custom Menu In WordPress
Are you looking for a way to create custom menu in WordPress using the Gutenberg editor to let your visitors enjoy a smooth browsing experience? Look no further! In this blog, you will find everything you need to create a custom menu in WordPress. So, let’s get started and create a custom menu that will make your website stand out from the crowd!

Beyond Browsing: Explore With The Menu Bar As Your Guide
Before getting deep into the topic, let’s talk a bit about what a menu is for a website. A website navigation menu is a structured collection of links to other pages or posts on a website, usually, the internal ones. Website menu bars typically appear in page headers, footers, or sidebars across a website, fostering easy access to the most important pages for visitors. Clear and concise wording is crucial for effective navigation, ensuring that visitors can easily understand what information is available for each menu item.
While the appearance of menus may vary based on the size of the website, key navigation elements should prioritize the most important themes covered by the site, such as the About Page, Products, Pricing, Help Page, etc. Your custom menu for the website should be engaging but not perplexing, making it easy for visitors to access the desired content.
Why Is A Menu Bar Important For Website Design?
An effective website menu is considered an essential element of successful website design. This is not merely a subjective claim, research has confirmed its authenticity and significance. A research study says that 38% of consumers examine a website’s navigational links and layout when visiting it for the first time. This emphasizes the importance of providing a clear and user-friendly menu bar to enhance the user experience and help visitors easily access the content they need.
In today’s fast-paced digital world, visitors have little patience. They want everything in seconds. If anyone visits your website and struggles to navigate through the site to find the essential data, this is going to cause a serious negative impression of your site. And you will find a direct impact of this on the bounce rate, conversion rate, and traffic of your site, as your visitors won’t stay long on your site and definitely won’t think of visiting it twice.

So creating a well-designed custom menu for your website is really important. This is to provide a roadmap for users to explore the various sections of the website and find the information they need.
A well-designed custom menu can also enhance the overall user experience of a website. A clear and organized menu bar can give the website a more professional and polished vibe. This in a way helps to build trust and credibility with users. An effective navigation menu can enhance a website’s accessibility and usability, creating a more inclusive experience for all users. Furthermore, a menu bar can help to reinforce the branding of a website by featuring the website’s logo and colors.
An optimized menu bar can also streamline internal linking between pages on your site. Internal linking helps search engine bots to understand the structure of your site in a better way. It also feeds the bots, the relationships between pages, which can improve their ability to crawl and index your site.
In summary, a menu is a very crucial element of website design that should not be overlooked. It provides users with a clear and organized navigation system that enhances the user experience, establishes credibility among users, and improves the SEO score of the website.
Navigate With Style: Discover Different Menu Designs
A website’s menu bar is the gateway to its pages. This makes it one of the most important design elements for any website. A well-designed custom menu makes it easy for users to navigate a website, locate information quickly, and enhance the user experience. However, with so many menu types to choose from, it can be challenging to know which one is the best choice for your website.
Horizontal Menu
The Horizontal menu is the most regular type of menu, commonly found at the top of a website. It consists of a horizontal bar with links to various pages or sections of the website. This type of menu is appropriate for most website designs, making it a popular choice for web designers.
Drop-Down Menu
A Drop-Down Menu is a type of menu that showcases a list of links or options when a user clicks on a button or hovers over a specific area. This type of menu is more appropriate for websites with a lot of pages or sections. Drop-down menus provide a clean and organized way to portray information, making it easier for site visitors to find what they’re looking for.
Vertical Side Menu
The vertical menu is placed on the side of the website, mostly on the left side of the design. It’s a great pick for websites with a lot of content or pages. Vertical menus are easy to navigate, and website visitors can quickly find the information they need by scrolling down the menu.
Footer Menu
A Footer Menu is a navigational menu that is placed at the very end of a Web page. It usually contains links to important pages such as the About Us, Contact, and Privacy Policy pages. A footer menu is an important element in web design as it provides users with quick access to vital information. It also helps to enhance the overall user experience by making it easier for users to navigate the website.
Those who read your content or scroll down your web page to the very end are more engaged than most other users. You can capitalize on this engagement by adding a footer menu featuring interesting pages or content. Doing so can enhance the user experience and increase engagement with your website.
Hamburger Menu
The hamburger menu is a popular choice for responsive website designs. Commonly it consists of three horizontal lines stacked on top of each other, resembling a hamburger, or of course, you can use any other icon or sign in your customized menu. When clicked, it reveals a dropdown menu with links to various pages or sections of the website. Hamburger menus take up minimal space on the screen. This makes it ideal for mobile users.

How To Create Custom Menu In WordPress Gutenberg
Now that you know how a custom menu can help you design a lucrative webpage while enabling quick and easy navigation for visitors, let’s see how you can create one. Following is a step-by-step guide on how to create a custom menu in WordPress.
Step 1: Install And Activate Essential Blocks For Gutenberg
To install the plugin, from your WordPress dashboard go to ‘Plugins’ → ‘Add New’. and then search for the plugin ‘Essential Blocks For Gutenberg’ from the search panel. And then install and activate it.

Step 2: Activate The Advanced Navigation Block
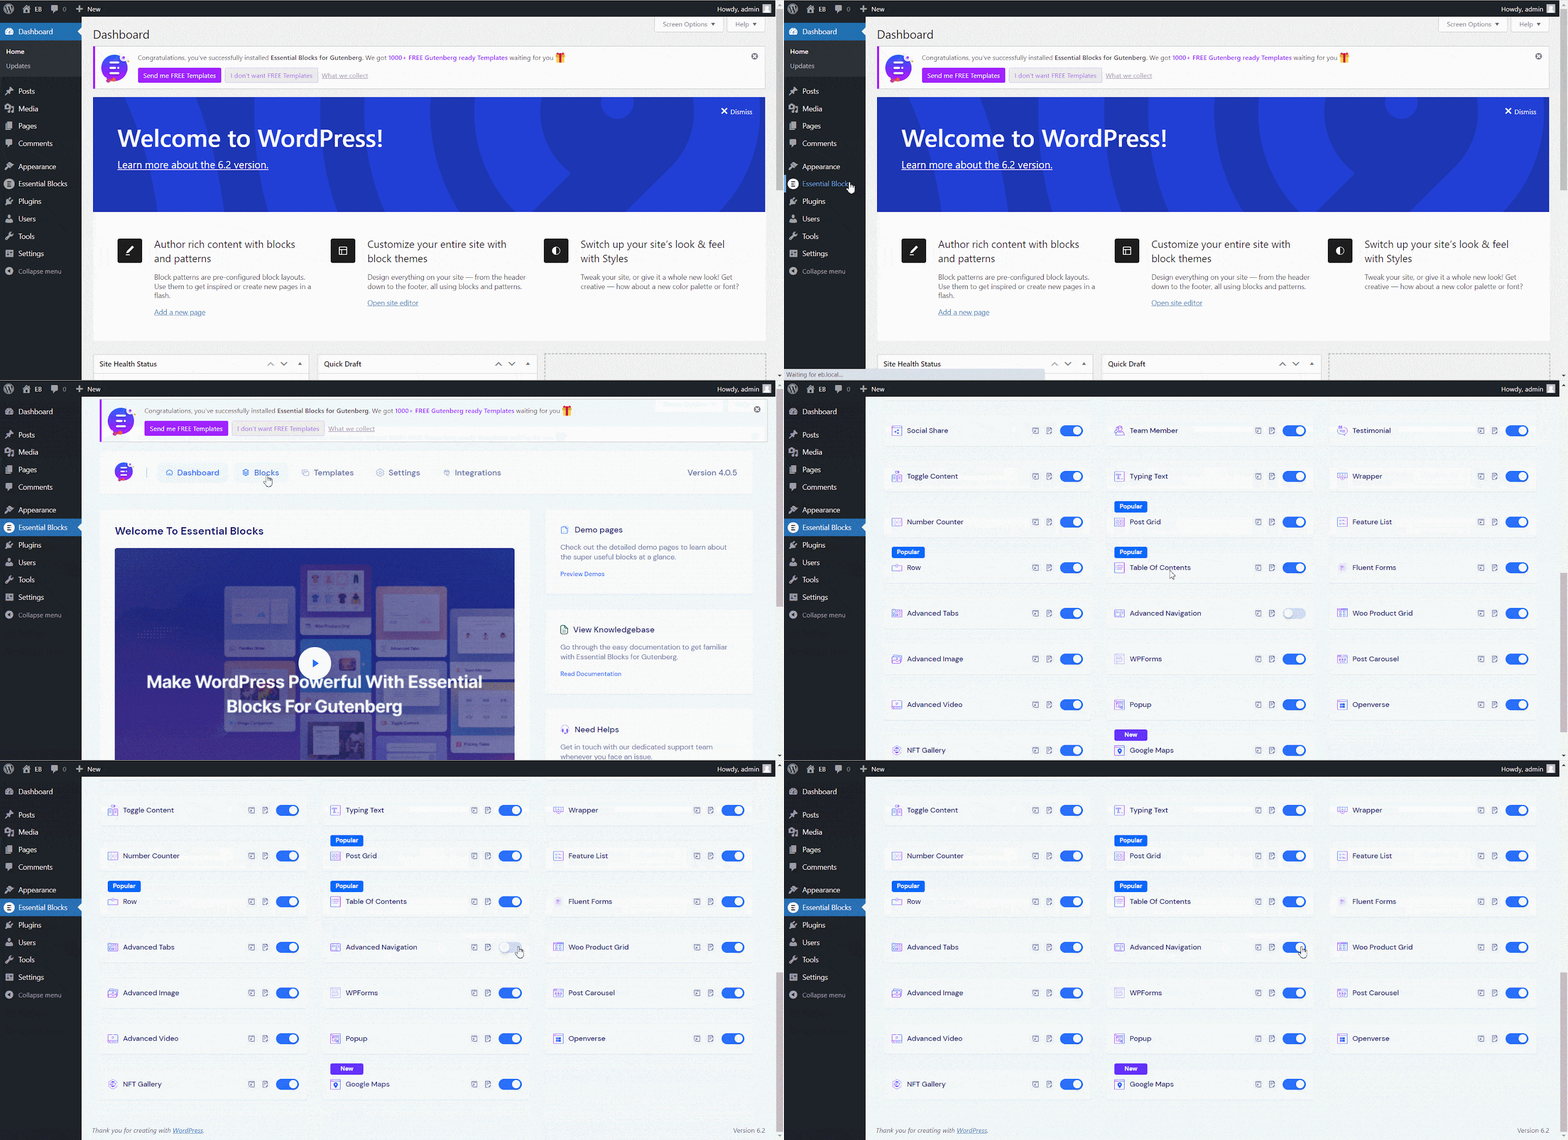
Now that you have installed the plugin, you need to make sure that the EB Advanced Navigation block is enabled. To check that, navigate to ‘Essential Blocks’ → ‘Blocks’ from your WordPress dashboard. Once there, check whether your block is enabled or not.
If not then simply toggle the ‘Advanced Navigation’ option to enable it. That’s it, you’re all set to start using the powerful EB Advanced Navigation block to create a stunning navbar for your website.
Step 3: Add Advanced Navigation Block
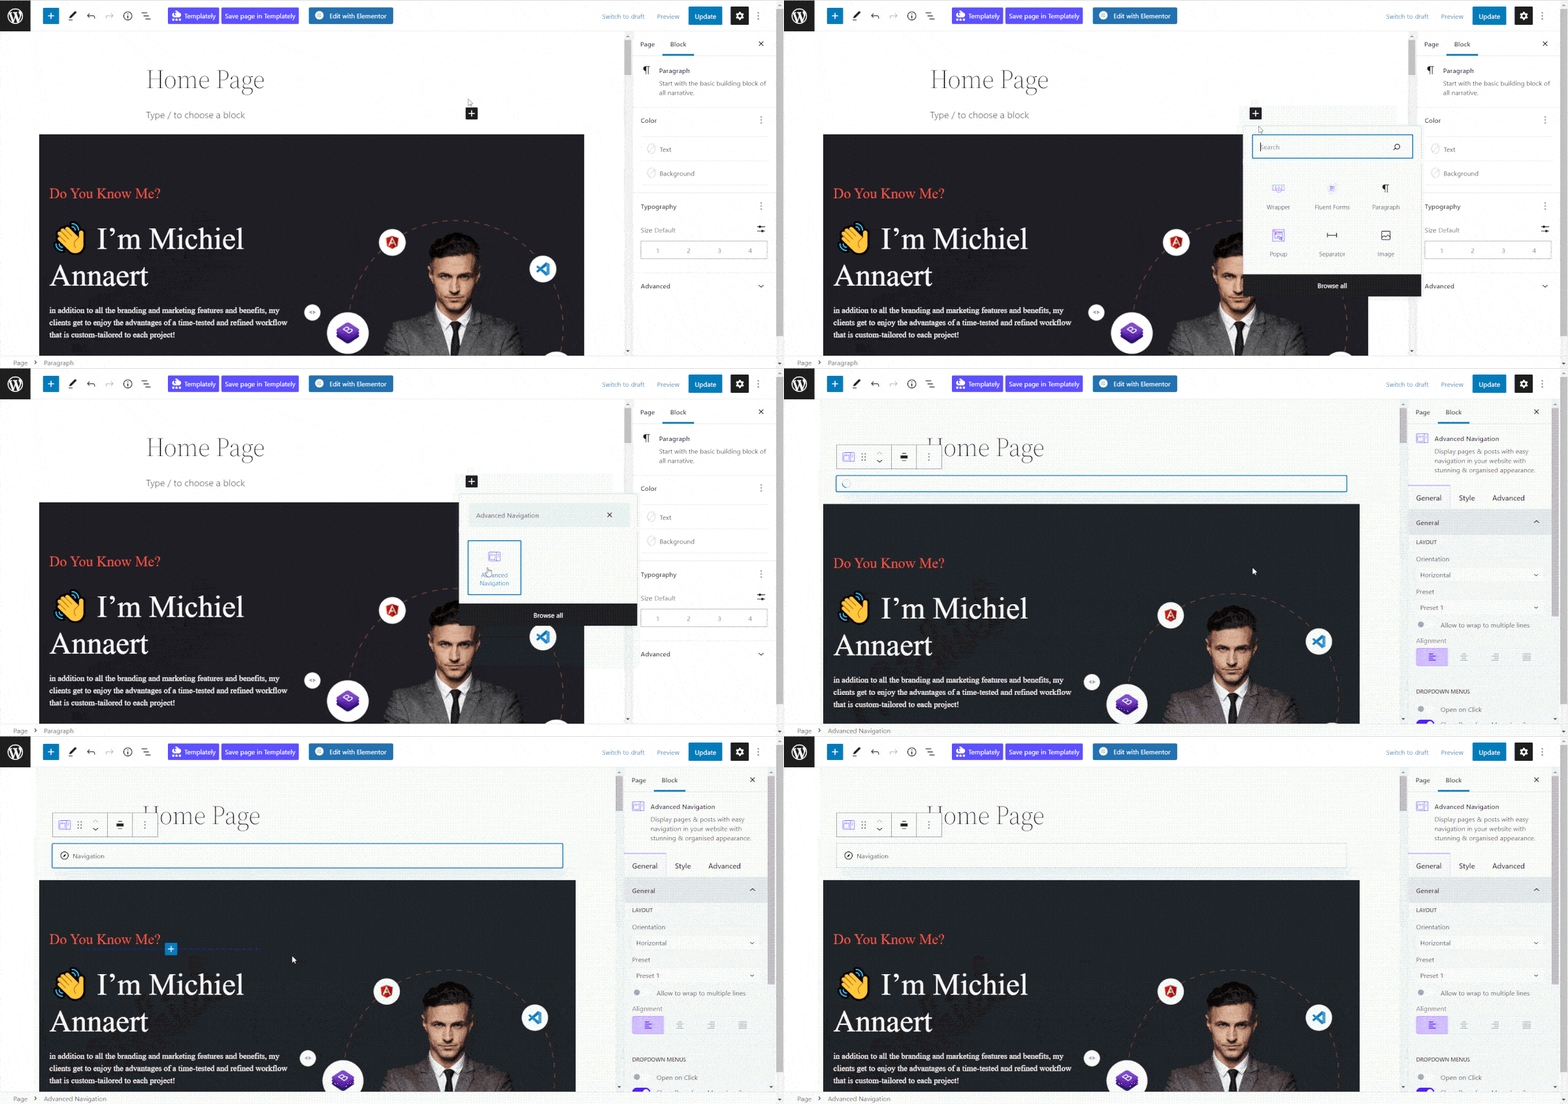
Now find the page where you want to add the navigation block. Then click on the ‘+’ icon and search for the block ‘Advanced Navigation’. Now click on the block upon its appearance and instantly the block will be added to your page.
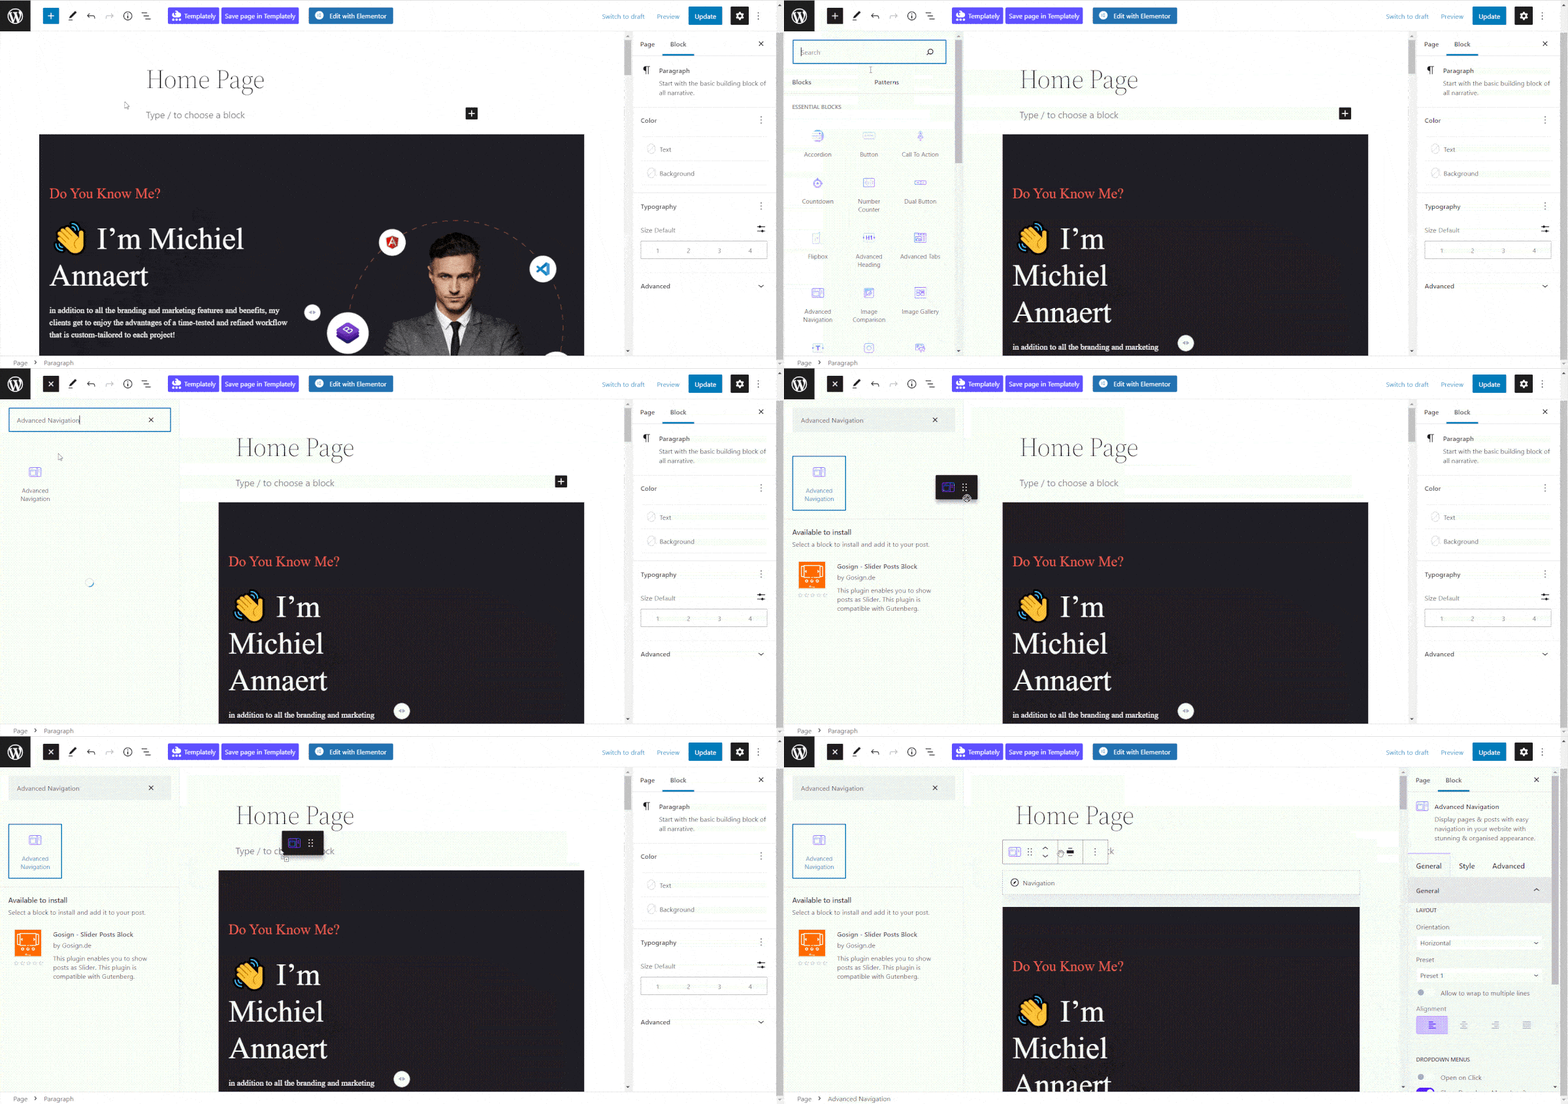
There’s also another ‘+’ icon at the upper left corner of the Gutenberg editor. You can also click on that and find the ‘Advance Navigation’ block. Then drag and drop the block to the place you want it to create custom menu in WordPress.
Step 4: Explore The Advanced Features Of Advanced Navigation
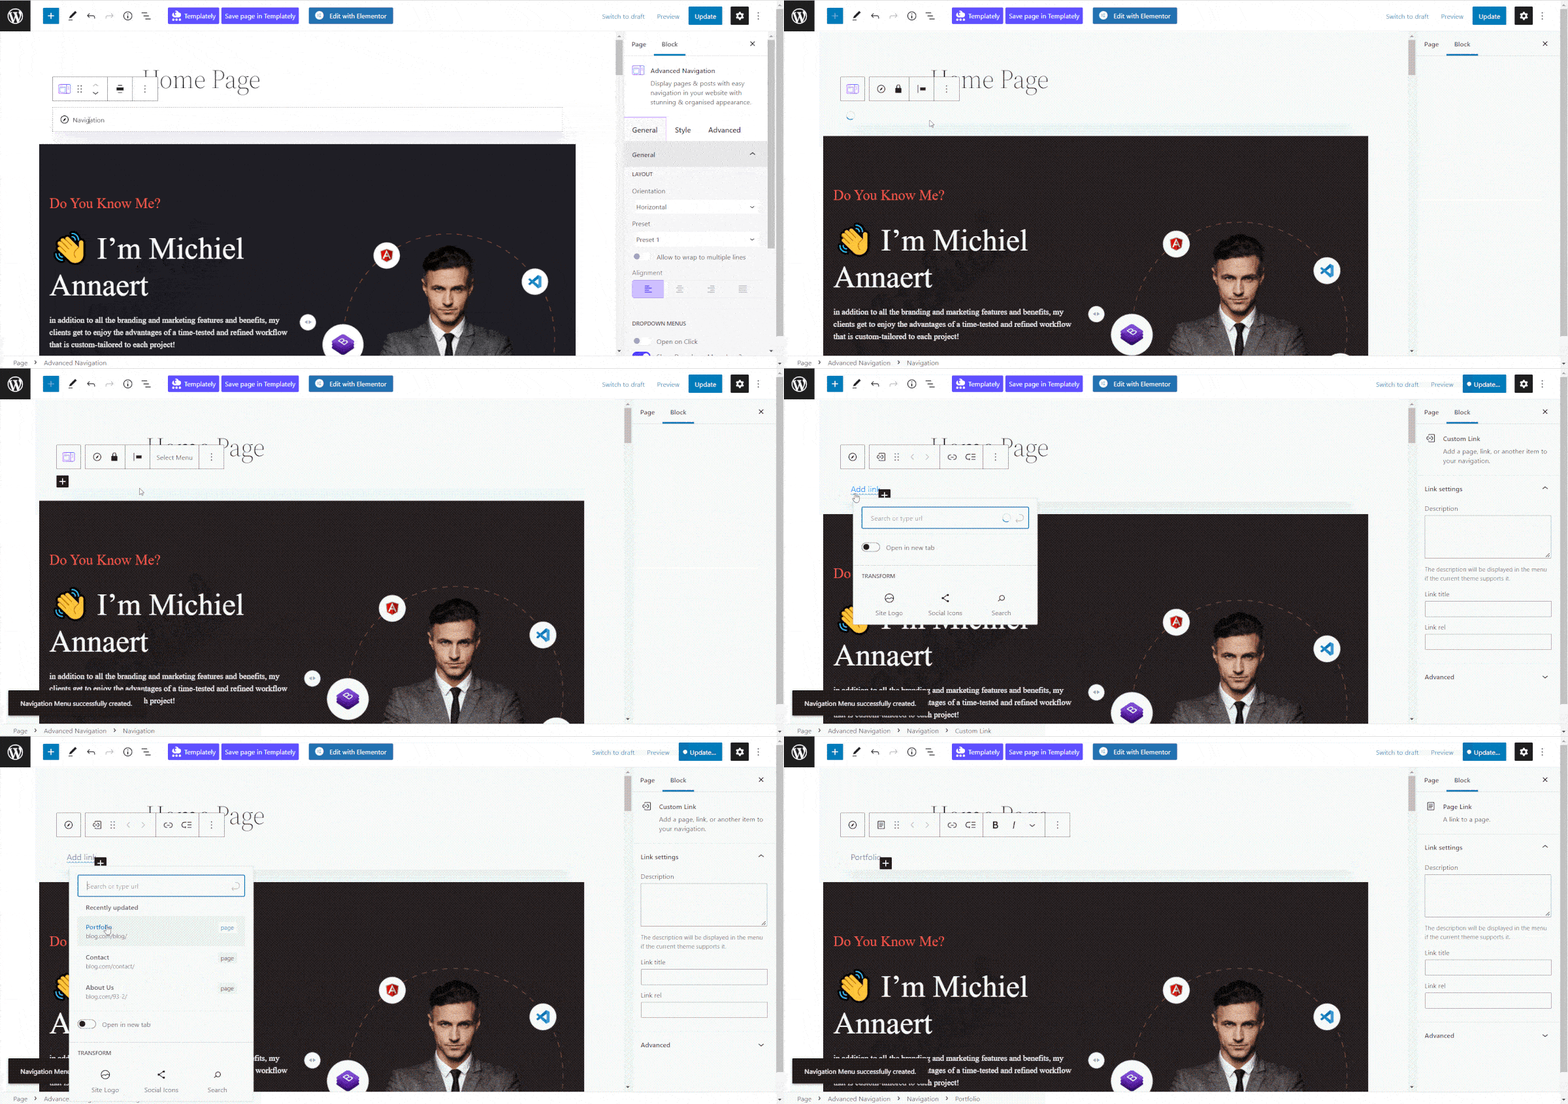
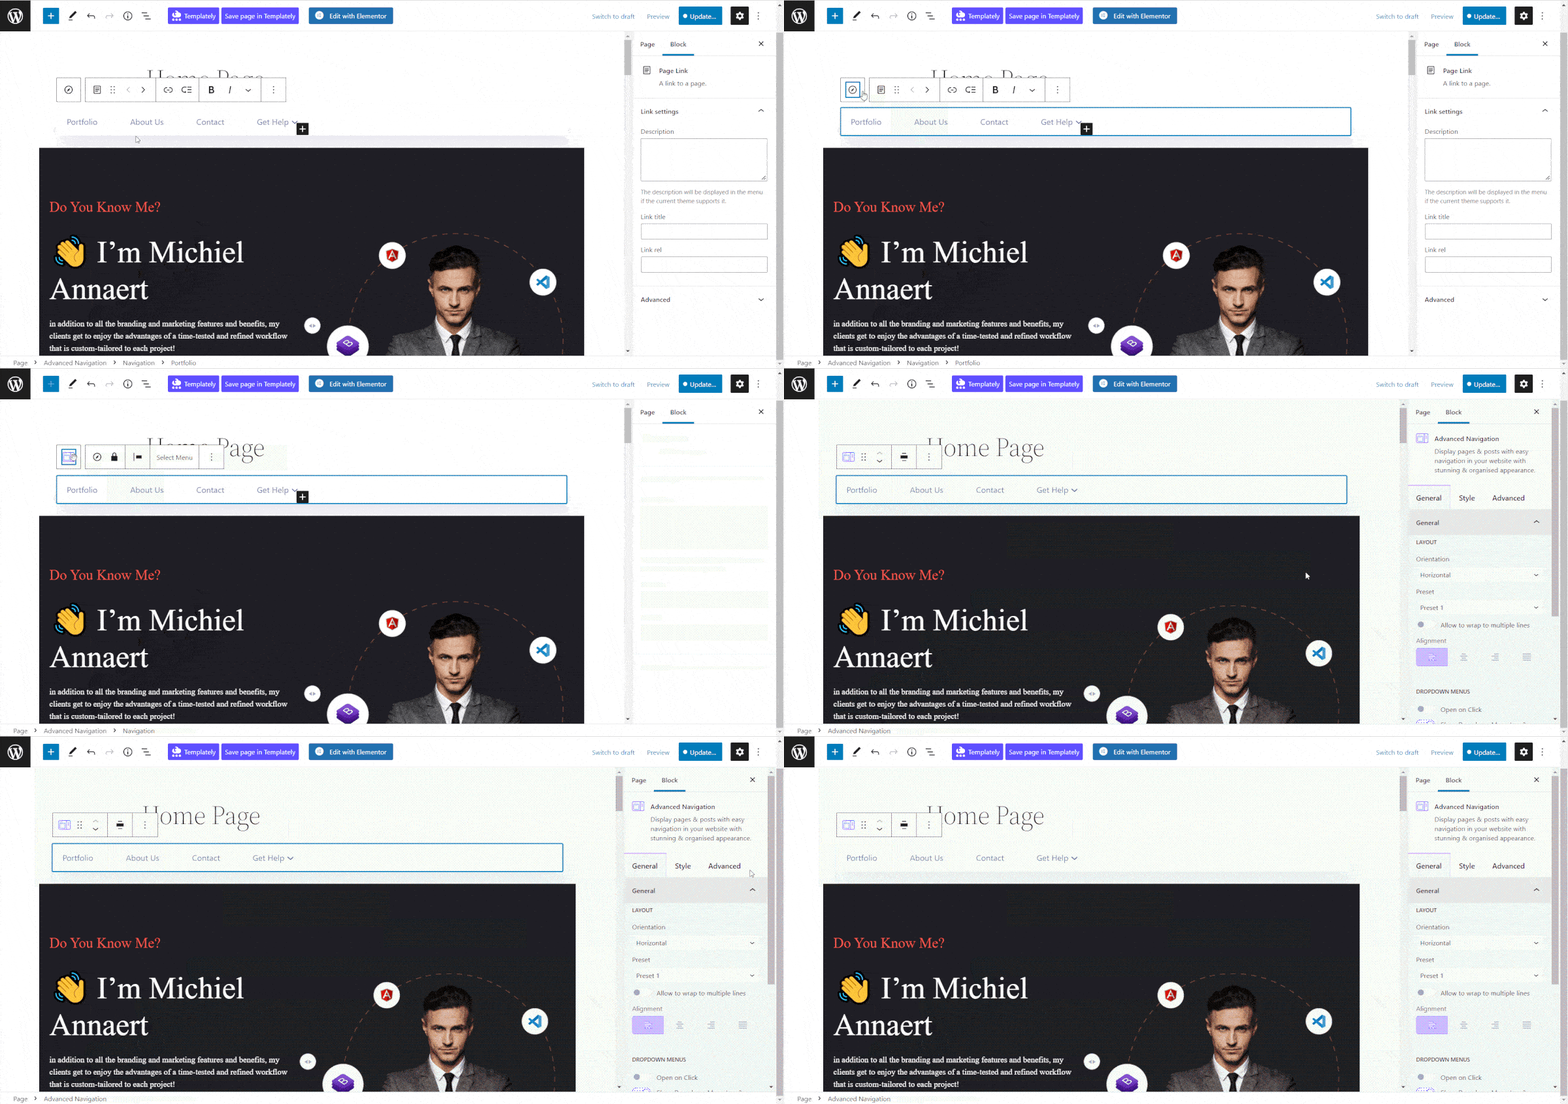
After adding the EB Advanced Navigation block to your website, the next step is to add the pages or posts that you want to portray in the navigation menu. To begin, click on the navigation bar and select ‘Start empty’.
After that, click on the ‘+’ icon and choose the page or post that you want to add to your navigation menu. Now repeat this process by clicking the ‘+’ icon again to add more pages or posts to your navigation bar. You can add as many pages or posts as you want.
After creating the menu comes customization. To do that, click on the navigation icon and select ‘Advanced Navigation’ to open the Gutenberg ‘Settings’ on the right side of your editor. Now, navigate to the ‘General’ tab to customize this block as you want.
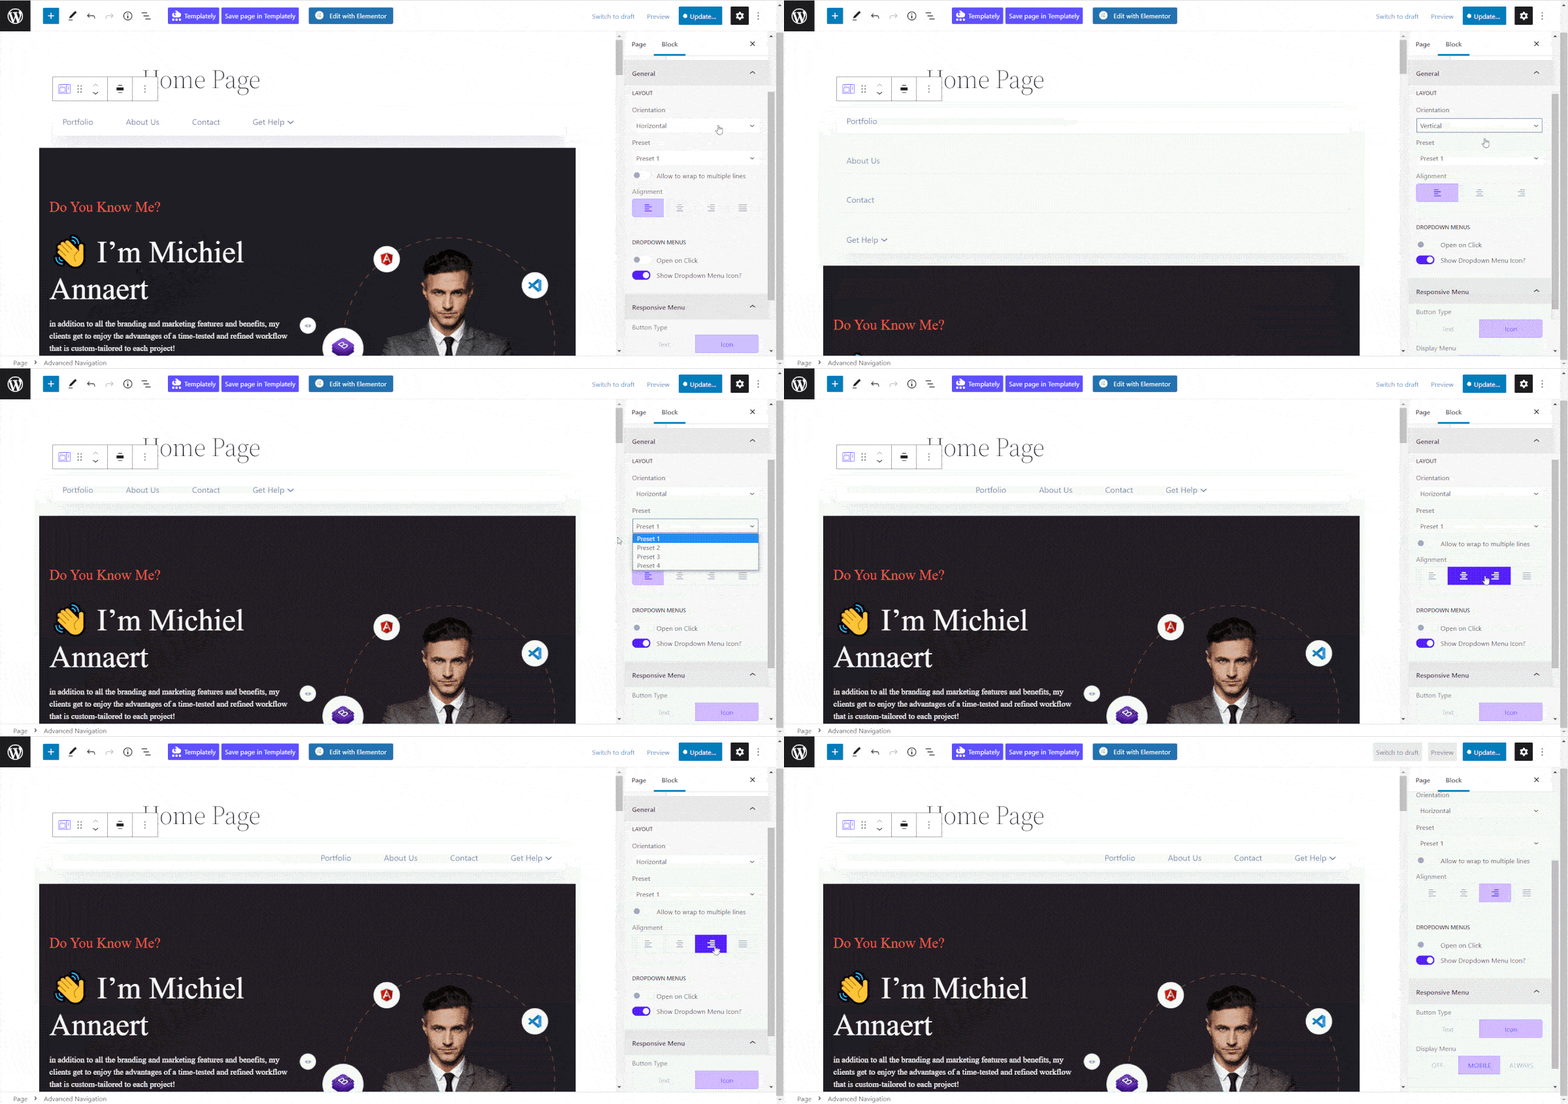
In the ‘Layout’ section, you have the option to customize the orientation of your menu. You can choose to display the navigation bar either vertically or horizontally. Additionally, you can select a design preset from the available options in the ‘Preset’ menu to give your menu a ready-made design style.
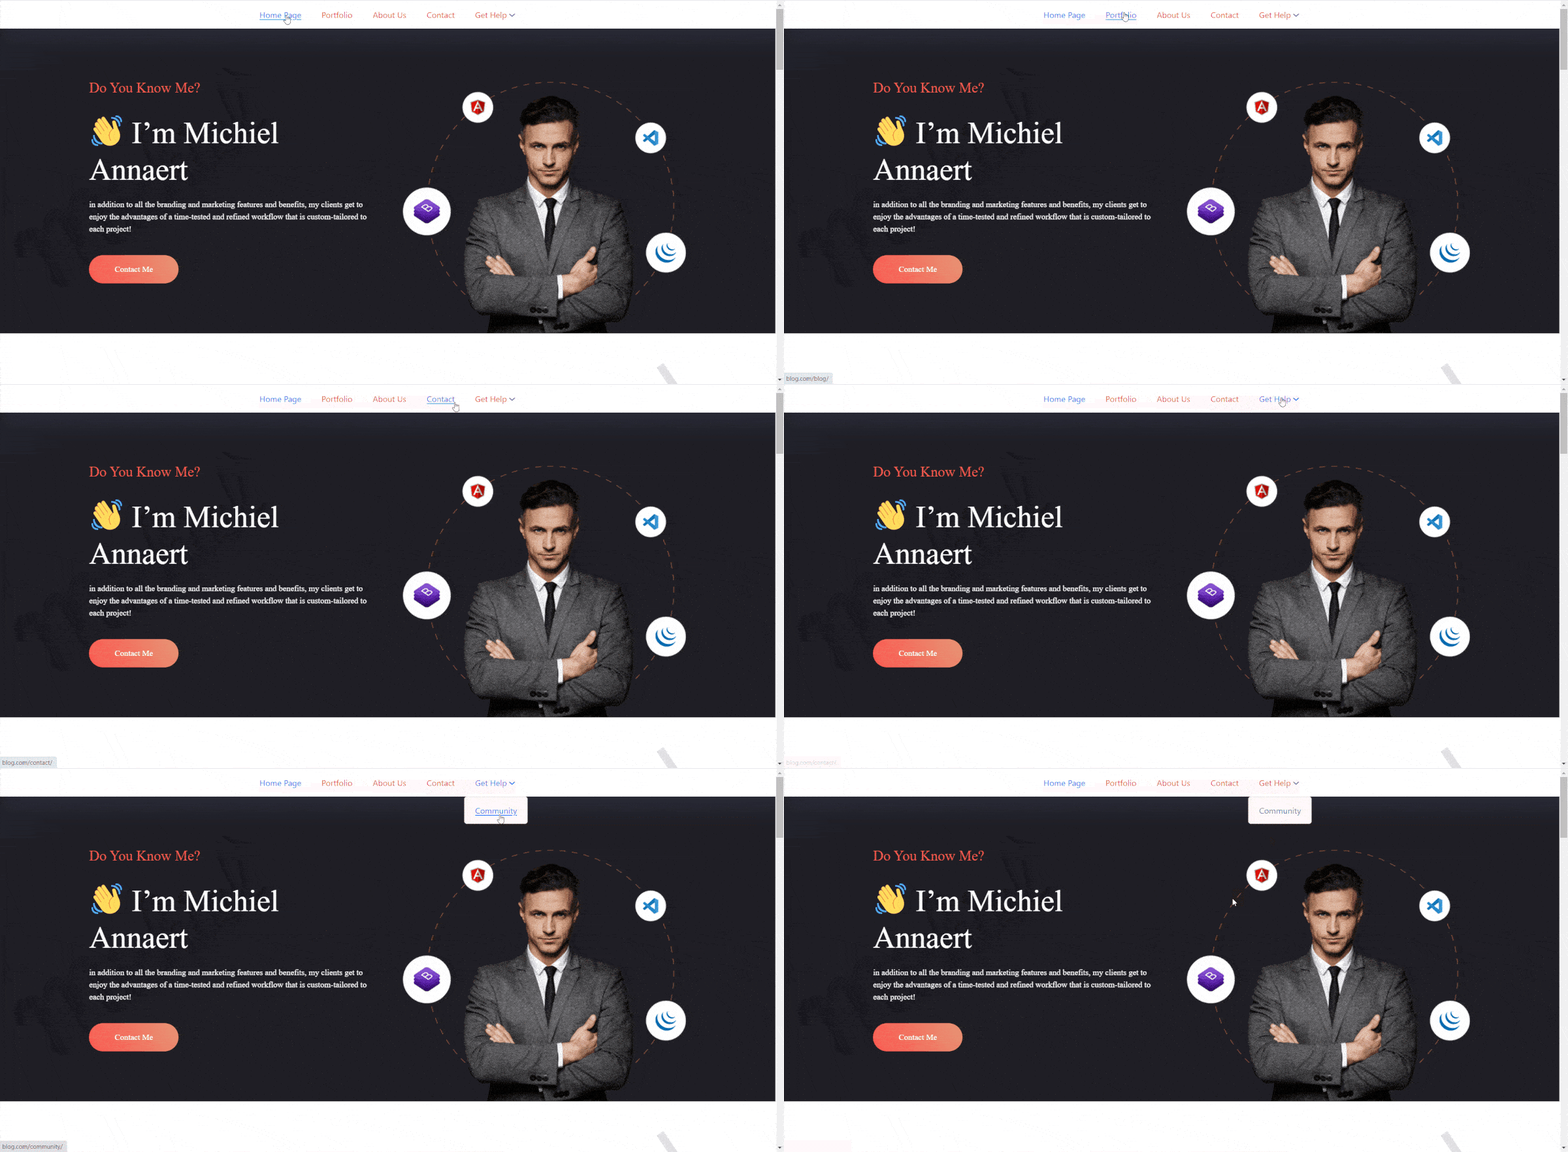
This is how easy it is to create custom menu in WordPress Gutenberg With Essential Blocks. For a detailed process and know-how guide, you can follow our documentation on this. After proper customization, your Advanced will look something like this:
Ready To Create An Easy Navigation Panel For Your Website?
With the steps outlined in this blog post, you now know how to create a custom menu in WordPress using the Gutenberg editor. So would you start creating one now? Please let us know about your experiences.
Don’t forget to subscribe to our blog to get more tips and tricks. You can also join our Facebook Community to stay connected with us.
